• There is NO official Otland's Discord server and NO official Otland's server list. The Otland's Staff does not manage any Discord server or server list. Moderators or administrator of any Discord server or server lists have NO connection to the Otland's Staff. Do not get scammed!

Photoshop Signature how to do tutorial

Spartacus

New Member
Joined
Jun 2, 2009
Messages
43
Reaction score
0
Part:1

Spartacus said:
In this tutorial you will learn how to create a nice flow in your signature using the liquify tool and some other cool techniques.

At the end of this tutorial you will be able to:

* Blend your render using smudging
* Use the wave filter to create your background
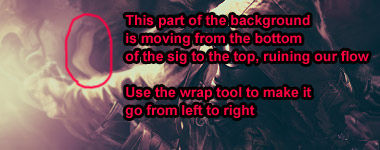
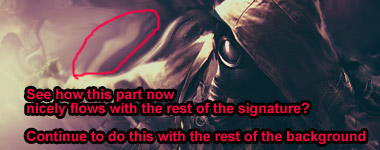
* Use the liquify tool to enhance flow
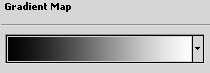
* Use gradient maps to color your signature
* Add some nice effects to improve the flow.

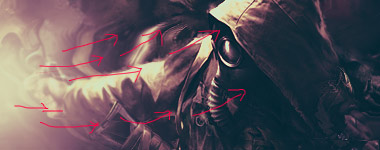
We will be creating the following signature:
hiding.jpg


Finding a nice render

Before we start you will need a render that has some sort of action going on in it. For example someone shooting.

Creating the background.
Lets get started by opening a new document in photoshop, I choose 380px x 150px.

Now add your render, but don’t resize it yet, we will be using the render to create our background.
hiding1.jpg

As you can see the render doesn’t fill the entire background, to solve this go to Layer > Duplicate Layer and move the duplicate so it fills your entire canvas.

Now select both layers using ctrl and go to Layer > Merge Layers
hiding2.jpg

Now go to Filter > Disort > Wave and use the default settings, just play around untill you got something you are happy with.
hiding3.jpg

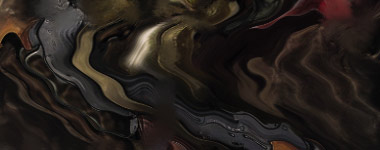
Now our background is finished, thats all easy isn’t it.
 
Part:2
Adding the render
Time to add our render into our scene. So add it again on a new layer and resize it so the most important parts of the render are visible.

I often see people making the render really small so the entire render fits the signature, don’t do this you only want the most interesting parts to be visible.

For example in the render I used the most important parts are the face and the gun, so thats the parts I want to be visible.
hiding4.jpg

ime to blend our render with the background so it doesn’t stand out that much from the background. To do this I choose to slightly smudge the sides of the render, if you don’t know how to smudge I suggest you to read one of the many smudge tutorials!

With the following smudge settings my blended render looks like this:
hiding5.jpg

Adding a Light source
Time to add a source of light in our signature, by looking at the shadows and highlights on the render I determined that the light was coming from the left, near the gun.

To add the light I selected my brush tool, and with a 300px white soft round brush I brushed once to create the light.
hiding6.jpg

Re colouring the signature
I did not really like the colors of my signature, so time to change this!

What I like to do is first make the signature black and white, after which I can determine what colors look good.

There are many ways to make your signature black and white, I simply used a gradient map (Layer > New Adjustment Layer > Gradient Map) and I picked the black to white gradient.
hidinggradient.jpg

hiding7.jpg

To add some color to the signature I again used a gradient map. This time I just tried all the different gradient maps untill I found one that looked nice.
hiding8.jpg

Creating flow
Nowadays everyone is talking about flow and depth. Why? Simply because once you have mastered these your signatures look 10 times better!

Its hard to give a real definition of what flow really is. If you want to read a great tutorial on flow, check out this great tutorial by glassbitch on the sigtutorials forums.

I will now show you 2 techniques to create some good “flow” in your signatures.

This is the flow I want to create in this signature:
hiding9.jpg

The Liquify Tool
Create a new layer and go to Image > Apply Image, now with this layer selected open the Liquify Menu (Filter > Liquify) and select the Forward Warp Tool (W) I used a size of around 50-100px.
hiding10.jpg

Now take any parts in your background that don’t flow well with the rest of the signature and using the warp tool, manipulate them so they flow well with the rest of the signature.
hiding11.jpg

Here is my result after this step:
hiding1.gif

Brush Tool effects.
Lets add some cool effects to the signature. Open the brush tool (B) and select a soft round brush with a diameter of 6px. Use the same color as your light source. (so for me its yellow/white).

Now open our brush tool manager (F5) and select the following settings:
hidingbrush.jpg

hidingbrush2.jpg

Now brush to add a nice effect to your signature, after some brushing my signature looked like this:
hiding12.jpg

Finishing the signature

Now its time to add the border and some text.

For the border I used the Marquee Tool (M) to make a selection (on an empty layer) at the top of the signature. I used the paint bucket tool (G) to fill this selection with black. Now simply duplicate this layer and move it to the bottom and your border is done!

Now its time to add some text, I used a font from the blade runner movie and using the marquee tool added some bars next to the text to make it look more interesting.

Make sure you place your text close to your render, and have the text color match the rest of your signature!

My Final result looks like this:
hiding.jpg
 
I think you failed a rip-off. ô.O
 
It's a rip cause I saw this on some Artwebsite.
 
Back
Top