ExibeR
Lua/C++/PHP Programmer
A normal day will be long and heavy without coffee, and most new workplaces today have a percolator to motivate their employees.
So why not trim your percolator so you can be the hero at work?
This guide will learn you how to trim your percolator so it makes coffee which is so strong that it will kick your liver out of your ass, and flush itself down the toilet.
NB:
In this guide we will use a Moccamaster. To follow the guide with another percolator, you'll first have to cut it up in 100 pieces. Then take those 100 pieces and cut them into 100 new pieces and then put it on fire. When your finished, go to the store and buy a Moccamaster.
Required Items:
* 1x Moccamaster
* A 1m stainless steel pipe @ 80mm
* Some good net
* 1x power switch
* 1x ball valve
* Screws and bolts of various kinds
* 1x 2000W fuser
* Artisan skills or just a hammer
Prepare For Trimming:
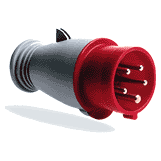
To upgrade our Moccamaster to create gunpowder strong coffee, we'll have to replace all weak parts. Let's start with the easiest one which is the plug. The percolator will require a lot of power, so we'll have to replace the normal plug @ 200 volt with a bigger and stronger "3-phase 16A 400 volt" plug.
It won't hurt if you rent about a meter or two of your neighbors
thickest extension cord.
The original switch on the percolator will be a problem. It will most likely catch on fire after a few seconds, if you try to use it in this project. We have chosen to use a stronger switch, but it's up to you which solution you choose.
WRONG

CORRECT
Heater:
The percolator will be really powerful when it's trimmed, and the heater is the heart of the percolator. Our goal is not a "straight-from-the-store-percolator which just boil the water, and filter it through some paper. Our percolator shall heat the water up to 150 Celsius degrees under pressure and then shoot the coffee through the coffee powder, and melt it so you get 100% pure coffee straight in the can. Stronger coffee is impossible to make.
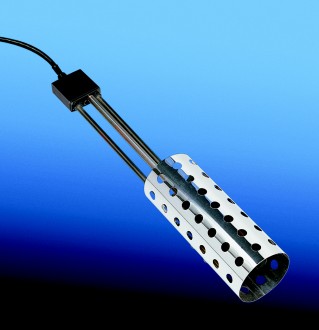
Back to the heater. This heater should be on 2000W, and should deliver so hot water than it can melt the coffee powder without any problems. You install this heater on the inside water tank. Be careful when wiring up the heater to the switch, electricity is dangerous stuff.
The new heater
Reinforcement:
To boil the water under pressure all weak parts has to be reinforced. Etc. the lid has to be strongly attached and sealed. We'll also attach a small steel tube so we can refill water.
Usage of the new percolator:
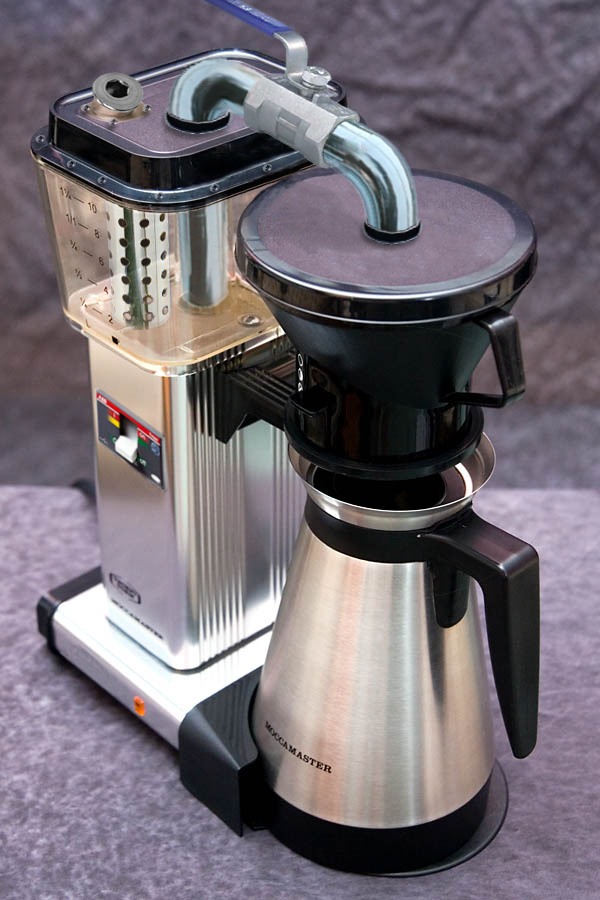
You should now be ready to start using the new percolator. It should look something like the image below. To make some coffee, you'll of course start by filling the percolator with water and coffee powder. When done it's just to turn it on. Then wait a few seconds until the percolator has boiled up a good pressure. Then it's just to open the ball valve. It can be an advantage to use glasses just to be sure.
When you have assured yourself that it works it's just to bring it to your colleagues or even your boss. A promotion has never been easier to ask for. Good luck!
Result
So why not trim your percolator so you can be the hero at work?
This guide will learn you how to trim your percolator so it makes coffee which is so strong that it will kick your liver out of your ass, and flush itself down the toilet.
NB:
In this guide we will use a Moccamaster. To follow the guide with another percolator, you'll first have to cut it up in 100 pieces. Then take those 100 pieces and cut them into 100 new pieces and then put it on fire. When your finished, go to the store and buy a Moccamaster.
Required Items:
* 1x Moccamaster
* A 1m stainless steel pipe @ 80mm
* Some good net
* 1x power switch
* 1x ball valve
* Screws and bolts of various kinds
* 1x 2000W fuser
* Artisan skills or just a hammer
Prepare For Trimming:
To upgrade our Moccamaster to create gunpowder strong coffee, we'll have to replace all weak parts. Let's start with the easiest one which is the plug. The percolator will require a lot of power, so we'll have to replace the normal plug @ 200 volt with a bigger and stronger "3-phase 16A 400 volt" plug.
It won't hurt if you rent about a meter or two of your neighbors
thickest extension cord.
The original switch on the percolator will be a problem. It will most likely catch on fire after a few seconds, if you try to use it in this project. We have chosen to use a stronger switch, but it's up to you which solution you choose.
WRONG
CORRECT
Heater:
The percolator will be really powerful when it's trimmed, and the heater is the heart of the percolator. Our goal is not a "straight-from-the-store-percolator which just boil the water, and filter it through some paper. Our percolator shall heat the water up to 150 Celsius degrees under pressure and then shoot the coffee through the coffee powder, and melt it so you get 100% pure coffee straight in the can. Stronger coffee is impossible to make.
Back to the heater. This heater should be on 2000W, and should deliver so hot water than it can melt the coffee powder without any problems. You install this heater on the inside water tank. Be careful when wiring up the heater to the switch, electricity is dangerous stuff.
The new heater
Reinforcement:
To boil the water under pressure all weak parts has to be reinforced. Etc. the lid has to be strongly attached and sealed. We'll also attach a small steel tube so we can refill water.
Usage of the new percolator:
You should now be ready to start using the new percolator. It should look something like the image below. To make some coffee, you'll of course start by filling the percolator with water and coffee powder. When done it's just to turn it on. Then wait a few seconds until the percolator has boiled up a good pressure. Then it's just to open the ball valve. It can be an advantage to use glasses just to be sure.
When you have assured yourself that it works it's just to bring it to your colleagues or even your boss. A promotion has never been easier to ask for. Good luck!
Result