Hello! ")
If you don't know how to make text animations with Photoshop, you are more than welcome in this thread, and if you already know you can stay too.
This is Photoshop CS3, works with CS4 aswell, but if you want to do it with CS2, you will have more troubles...
Let's begin opening a new Ps file (File -> New) or (Ctrl + N).
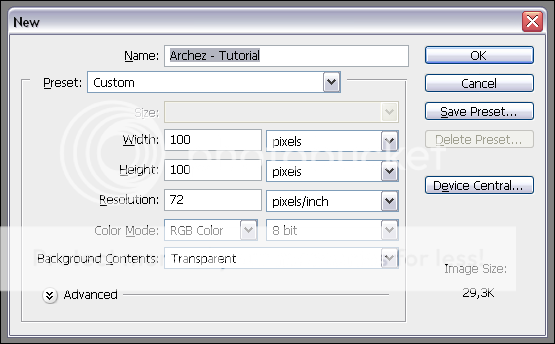
Now, click accept, 100px x 100px it's the normal member avatar's size. It's always good to manage more than one layer, because you just make a mess with 1.
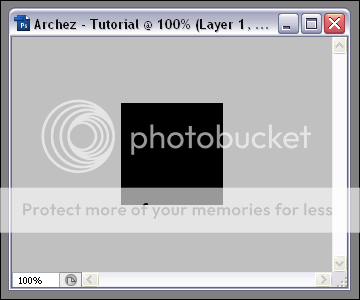
The first layer is already created so we just need to fill the complete transparent background with the color black, like this:
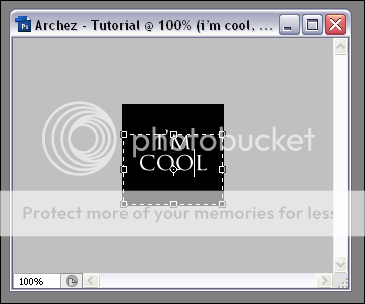
After that, use the horizontal type tool, or simply click (T) and write whatever you want...
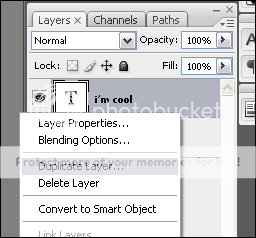
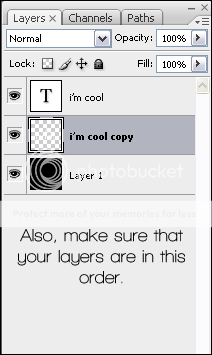
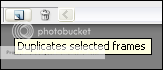
Easy right? let's go to the animation part... you will need to duplicate your text layer as how I am doing it in this screenshot:
After duplicating your text layer, you must raterize that layer. (How can I raterize my text layer? there's many ways to raterize your layers but a simple one is by clicking the brush tool and clicking 1 time over your text layer and it will pop up a window warning you about the text layer that is going to be raterized, and you just click 'OK')
Once it's raterized it will look like this:
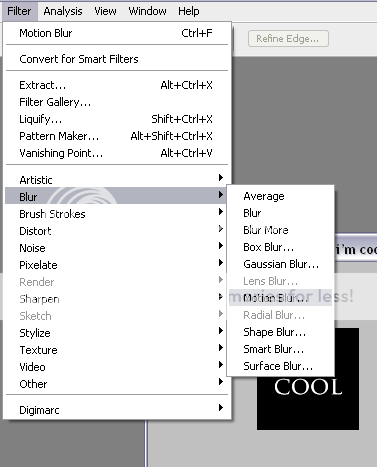
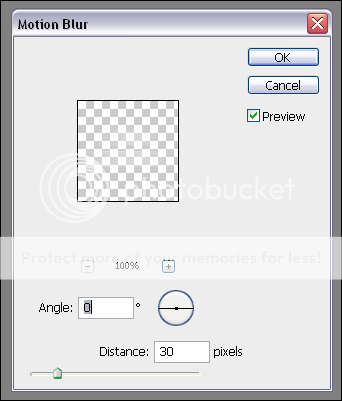
Now, selecting the current duplicated and raterized text layer, go to (Filter -> Blur -> Motion Blur [distance: 30px]) and click 'OK'...
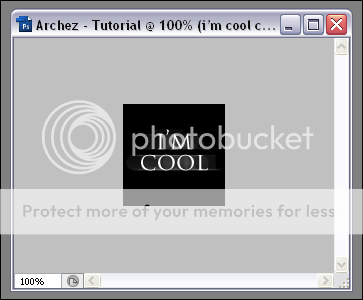
Outcome:
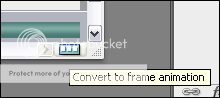
Now go to (Window -> Animation), after opening the animation window click here to convert your work to frame animation:
Now that you got your animation window open and changed to frame animation, you will see your black avatar there, in the animation window, for each frame you must duplicate the layer and hide the layers that wont appear in that frame. (The time it's below the frames)

Check how I duplicated my layers and hided the raterized layers in some of them:

Now, to finish your animation go to (File -> Save for Web & Devices) or simply click (Alt + Shift + Ctrl + S) and click 'Save'.
Outcome:
Congratulations, you just finished your animation!
If you think I cheated, look at my PSD") .
.
Download: http://uploadhyper.com/file/6266/cool.psd.html
Have fun!
//Archez
If you don't know how to make text animations with Photoshop, you are more than welcome in this thread, and if you already know you can stay too.
This is Photoshop CS3, works with CS4 aswell, but if you want to do it with CS2, you will have more troubles...
Let's begin opening a new Ps file (File -> New) or (Ctrl + N).
Now, click accept, 100px x 100px it's the normal member avatar's size. It's always good to manage more than one layer, because you just make a mess with 1.
The first layer is already created so we just need to fill the complete transparent background with the color black, like this:
After that, use the horizontal type tool, or simply click (T) and write whatever you want...
Easy right? let's go to the animation part... you will need to duplicate your text layer as how I am doing it in this screenshot:
After duplicating your text layer, you must raterize that layer. (How can I raterize my text layer? there's many ways to raterize your layers but a simple one is by clicking the brush tool and clicking 1 time over your text layer and it will pop up a window warning you about the text layer that is going to be raterized, and you just click 'OK')
Once it's raterized it will look like this:
Now, selecting the current duplicated and raterized text layer, go to (Filter -> Blur -> Motion Blur [distance: 30px]) and click 'OK'...
Outcome:
Now go to (Window -> Animation), after opening the animation window click here to convert your work to frame animation:
Now that you got your animation window open and changed to frame animation, you will see your black avatar there, in the animation window, for each frame you must duplicate the layer and hide the layers that wont appear in that frame. (The time it's below the frames)
Check how I duplicated my layers and hided the raterized layers in some of them:
Now, to finish your animation go to (File -> Save for Web & Devices) or simply click (Alt + Shift + Ctrl + S) and click 'Save'.
Outcome:
Congratulations, you just finished your animation!
If you think I cheated, look at my PSD
.Download: http://uploadhyper.com/file/6266/cool.psd.html
Have fun!
//Archez

