Shadowsong
Game Developer & Graphic Designer
- Joined
- Feb 23, 2010
- Messages
- 3,446
- Solutions
- 21
- Reaction score
- 3,014
- Location
- Bosnia & Herzegovina
- YouTube
- ShivaShadowsong
Using Adobe PS for spriting - Tutorial (for total photoshop scrubs)
Hello and welcome to another one of my tutorials.
(If you don't have Photoshop, and you want to get it, keep reading)
۞ Prologue ۞
Hello and welcome to another one of my tutorials.
(If you don't have Photoshop, and you want to get it, keep reading)
Spoiler alert - This tutorial is long and detailed as fok.
(I spoiled it for ya ,_,)
The previous one I had on spriting has long been outdated and the files were lost, but my mate Yellowhat recently made a tutorial on spriting that is worth checking out (it's stickied). Now, this one will be a little different. In this tutorial, we will focus on using only Adobe Photoshop and all the tools it can provide us to make awesome sprites.
I reckon many of you who checked out spriting tutorials are bored with what they have to offer visually/practically. Often times, people will start out teaching you how to make a sword, axe or rarely an armor. Not today!
Today we're gonna rock this thing. (Quite literally)
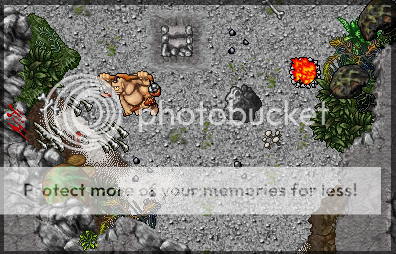
By the time this tutorial is done, you should be able to create awesome stones and rocks, such as this one:

Now, many people say they are fine using MS paint to sprite which I find absolutely ridicolous because it's a basic and, dare I say, inferior tool for creating images. Photoshop, on the other hand, is a widespread, well-known and useful tool which will help us quicken spriting and make it more efficient. Many people would like to use it but they can't get it because the software is pricy and the times are tough. Especially younger individuals who would like to get into PS, they can't because they have no cash to buy it, and by the time they should be earning money via PS, they are still stuck at .. you guessed correctly, MS Paint (or some other lesser tool)! Now don't get me wrong, I respect any artist and the methods they use to create art, I'm just saying here in particular, we'll be focusing on PS, and I think it's the best. Another reason is that people think it's hard to work in PS. Not at all! It's very simple, and you'll come to learn it now.
Well I have news for you. If you have enough cash, you should definitely buy this piece of amazing software. If not, fok it, pirate it. I'm not proud of doing it, but I had to get my hands on it by any means necessary. I don't wanna post any link here since I'm not sure OTLand's administration is content with pirating, but contact me and I can give you a legit link if you can't find one.
Note that I'm referring to these images as sprites, but not pixel-art. Why?
Because I don't want you to think this is pixel art. It kinda is, but not totally. That's why we won't call it pixel art. The reason for this are the methods that we'll be using to get these sprites. Many true pixel artists that go pixel-by-pixel with down to only 4-5 different colors in a whole picture get offended if you call this pixel art, because we're kinda cheating here. But who gives a damn, you know? It looks good, it has a practical usage, no one is going to judge you for taking a shortcut.
In this tutorial I'll be using Adobe Photoshop CS6, but all of these options and tools are available in the previous versions and if you have a different one, you are still able to follow everything, no worries! So without further ado, let's do this.
۞ Setting up PS and learning about basic time-savers ۞
It's very important to have quick access to all the tools you need, and to help yourself in all the ways you can to quickly achieve good results. This is why setting a proper grid, remembering hotkeys and choosing correct canvas size is crucial. You could do without it, but it's a timesaver.
- Setting a grid.
- What's a grid?
A grid is a structure made up from intersecting horizontal and vertical lines. - Why should we use a grid?
Grid helps us determine the position and volume of our sprite while working with a bigger canvas. It also helps when determining how aligned with the angle of 45° is a line you are drawing. - How to set up a default grid?
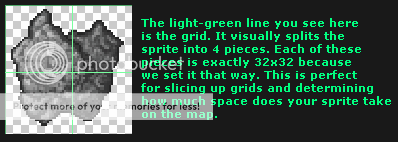
We want the grid to appear after every 32 pixels (default width/height of a sprite) so we can know when one slice (?) of the sprite ends. I will explain slicing down below later. Go to Edit -> Preferences -> Guides, Grids & Slices. Set this up:

The grid lines affect your image in no way, nor are they on it. They are like a visual overlay to help you determine things. You can easily turn them off with an assigned hotkey or View -> Show -> Grid (remember, always use hotkeys that you learn!) - Example usage of grid:
- What's a grid?
- Setting Up Hotkeys
- What's a hotkey?
C'mon man. You're a tibia player. You know what a hotkey is.
(it's a keyboard button that brings up a function upon being pressed) - Why should we use hotkeys?
I can't stress this enough - just use them! It will take some time to get used to them, but once you do, you will save so much time and you won't even notice it. It's much faster to press 1 key than to move your mouse around the screen and click on buttons. I will show you how to assign hotkeys in photoshop if you don't want to use the default ones, but either way, start getting used to them. - How to see what tool uses which hotkey?
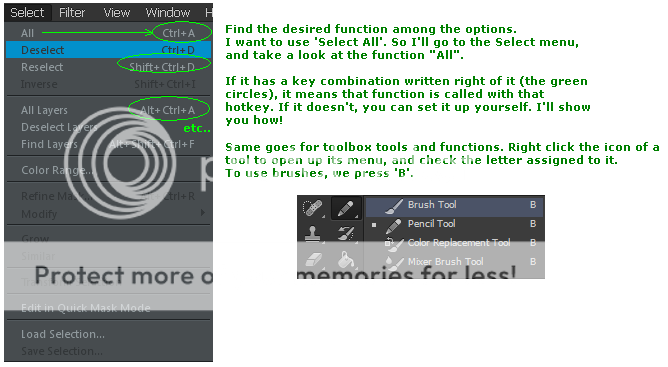
- How to assign your own hotkeys to functions?
Go to Edit -> Keyboard Shortcuts. Or, ironically, use the hotkey for it. (Alt+Shift+Ctrl+K)
- What's a hotkey?
- Setting up a canvas
- This one's easy. To set up a new canvas for work, press CTRL+N.
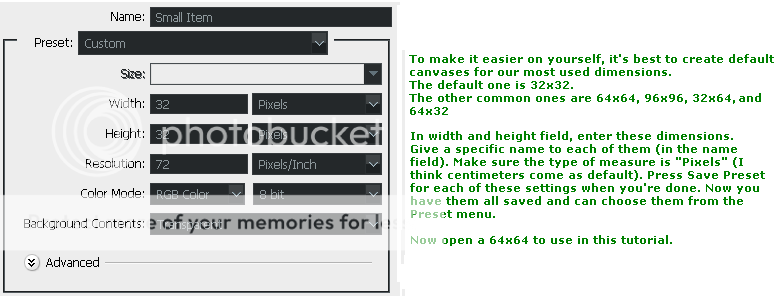
- This one's easy. To set up a new canvas for work, press CTRL+N.
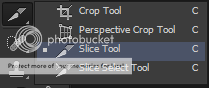
- Slices & Slicing
- What's slicing?
I won't elaborate much on this topic, but I'll just let you take a note that this is a HUGE timesaver for anyone who intends to work with sprites and then use them ingame. Because using sprites ingame requires them to be set up in DatEditor. And sprites bigger than 32x32 require to be cut into several pieces that are of such dimensions if you want to use them. So a 64x64 sprite must be cut into 4 pieces to be assembled and used in DatEditor. We use slice tool for this. If anyone needs instructions on this, please google it or give me a PM, I'll try to explain how it works. Maybe I will update this tutorial later but I don't deem it too important right now, just wanted to let you know this exists and you don't need to waste hours cutting big sprites piece by piece yourself. (like I did;_;)
- What's slicing?
- Brush, Pencil and Eraser
It comes as no surprise you'll be using these tools the most. Now, we need to set them up so they give you the best possible experience working with.
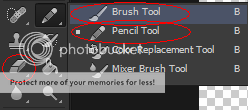
- What is the difference between pencil and brush?
Pencil is a pixel-precise tool that will not anti-alias itself upon usage. Brushes are quite the opposite. That's why pencils are used for drawing precise shapes, outlines, and such, while brushes are used for tapping and coloring in this tutorial. You can download brushes from the internet that come in various shapes and sizes, but in spriting we won't be using any of that, we just need the default circle brush. (Once you select the brush tool, right click on the canvas to pick a brush you want to use)
Allow me to demonstrate the difference:

While brushes look nicer, they utilize anti-alias and transparent pixels a lot which is something we definitely want to avoid (in regards of our outline, since tibia doesn't support transparent pixels). This is why their roles are such as I described. I forgot to mention, eraser can be set to erase things either way, like a reverse brush or a reverse pencil. You can change the eraser mode from brush to pencil (or viceversa) in the setting tab.
Most of the time, you want to work with 1px big brush/pencil, so set it that way.
Remember the hotkeys for these tools, and we can move on.
- What is the difference between pencil and brush?
- MASTER PRO TIPS & HOTKEYS
- Alt.
While working with a pencil/brush, if you press this key, your cursor will turn into a color-picker. Go with it over any color anywhere on the screen and your selected color will become the one you hovered over. Just release the alt key when you're done and you can continue coloring. - Alt + Mousewheel.
One of my favorite things about PS is the ability to easily zoom in and out as much as I want. (Not like in paint where you have fixed values of zoom). By pressing alt and scrolling your mousewheel, you can zoom in and out very quickly. To return to default size, press CTRL + 1. - CTRL + TAB
To switch between multiple images you opened in photoshop, press this. To reverse-switch, use SHIFT+TAB. - SHIFT + LEFT CLICK
Basically, this lets you do a straight line. If you drag your brush/pencil while holding down shift, it will be an absolutely straight line. However, you can also do this:
1. Click with pencil on the starting spot
2. Hold shift
3. Click somewhere else
- A straight line from the first to the second point will be created. Very good for creating perfect diagonal lines!
Also one more thing. NEVER, EVER, save your sprites in .jpg format. ALWAYS USE PNG.
- Alt.
۞ The part where you sprite a rock! ۞
So, open up a 64x64 canvas. Before you begin drawing stuff, you probably know that you need to determine which colors you're gonna use. In Window -> Swatches, you can open up a pallete of premade colors to which you can add your own colors by clicking into it with the color selected. You can easily make useable palletes this way, or you can do it the old-school way and draw them on the screen then use the color picker (alt). For a rock, I'll use this palette. Feel free to copy it and use it yourself.

Before I explain everything step by step, here is a demonstration of how things are going to go down:

First things first - use the outline color to draw a random rock shape. This is done by the pencil tool (1px). Make it a bit bigger (not smaller than 32x32):

Let's fix the jagged look by using the eraser tool on places where the lines get jagged or thick. Make sure the outline is 1px thick absolutely everywhere. This looks much smoother:

Now, we will incorporate the usage of another tool, and that is the paint bucket tool (G). G is also a hotkey for Gradient tool, so if this gets selected, right click it in the toolbar and pick paint bucket instead. This is how you should set up your paint bucket, and the reasons follow:
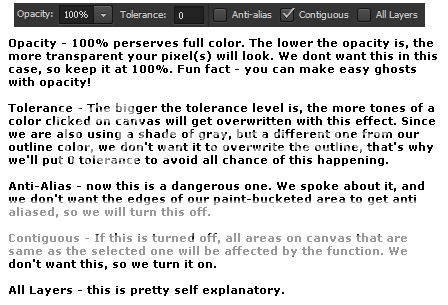
Now, take the darker shade color and use the paint bucket tool (G) to fill this drawn rock shape with the color. It should look like this:

Step four - take the brush tool. We talked about it quite a bit back there, and we are aware it needs to be 1px big for maximum precision. Zoom in and start painting. DON'T draw, unless you know what you're doing.
What I mean by "don't draw" is, don't color the thing by scribbling lines, holding down the mouse button while dragging the brush around or similar things. The method I use is to tap 1 by 1 click. This way I can already make the structure of the stone look rocky. Since we know that the light in tibia comes from north-west, we'll tap just a tad more on the north-west side than east. Tap the whole rock with the definition color until you get something like this:

The definition might not yet be fully visible (especially when zoomed out like this), but we're getting there. If you're not happy with the outcome, it's always easy to fix things by re-tapping or starting over a particular part (or even the whole stone). I'll make use of what I have here.
Now, take the lighter-shade color and use it on the most part of the rock at north-western points of the definition taps you made in step 4. For a better understanding of what I mean, take a look at this pic.
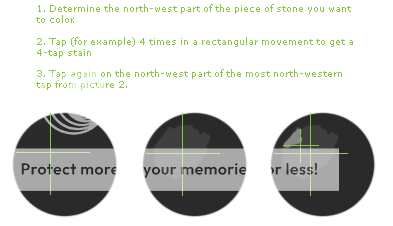
(I know this is may be a bit hard to understand at first, but once you grasp the concept, it becomes a habit. If you have any questions regarding this, please leave them down there.)
When we're done with over-tapping with the lighter shade, we get this:

You can notice how some of the rock's structure is visibly showing. I decided to leave those parts un-tapped so they would remain darker and thus give a look like there are holes and bumps in the stone.
Now, we do the exact same thing, however with a little stricter boundary. We won't go as much to the east as we went before, limiting ourselves a bit more to only the north-west and west- area of the rock, and we will do it with the highlight color now. Tap only on the north-west area of previous shade's taps. (basically the same as the previous step).

Okay, now what?
I take a better look, and i notice the "behind" part of the rock looks a bit weird. Its top is flat. I don't want that. You check your rock too and see if there are any final little changes you want to add before we finalize the sprite. This is known as re-detailing or decorating. You may add more holes, cracks, or whatever you want in this step. You don't have to change anything if you feel like you're doing good as it is.
So, here, I changed the shape of the "behind" part of the rock, and added a bit of outline's dark color to the parts where there rocky borders should be more noticeable:

Now basically, you are done with the sprite. Even tho what we did with the different shades is a part of the shading, this often is not enough by brushing, or you may want the outcome to look a bit sharper and defined. This is where 2 very powerful (yet wrongly abused) tools come in, and those are the Dodge and Burn tools.
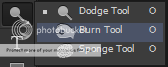
Dodge tool is used to lighten the image, while burn tool is used to darken it. There are 3 types of lightening/darkening that we can choose from.
"Shadow", "Midtones", "Highlights"
Now, for the sake of my fingers and the length of this thread, I will not describe what precisely each of these modes do. Even though it's kind of self-explanatory, I want you to do the following.
Press F7 to open the layer window if it already isn't opened.
Now press CTLR+J to duplicate the layer you are working with.
This way, you will have an exact copy of your rock that you can test this out with, while your original work stays untouched. (You can press the little eye icon next to the layer to hide it while you paint your test subject).
Take the duplicate layer and use both of these tools in all 3 modes to see what will happen. To tone down and soften the amount of effect, in the upper options tab where it says Exposure: 100%, turn exposure down to a lower number (I use around 18%). Taking in mind the general tibian shading rule + common knowledge of how shadows work, you should be able to mod your sprite further until you get the desired result.
Here is how the transformation went in my case:
A bit of burn to the east part of the rock:

More burn (shadow) to the east and south-east, more (highlight) dodge to the west and north-west.

Changed the contrast a little (Image -> Adjustments -> Brightness/Contrast)

Aaaand, ladies and gentleman, that would be it.
I deem this sprite perfectly usable in a tibia environment, and we should test that out asap.
However, everyone has a different taste and some may want it a bit brighter, less shadowy, or something else along those lines, so feel free to fulfill your every need with the tools given to you by PS.
Sometime soon, I may extend this tutorial to add more useful tips and teach you a few more tricks, but until then, please enjoy, try it out, and let me know how it went.
If you have any questions or require any help, leave it in the thread and I'll reply as soon as I find some free time.
Last edited:

 Thanks ♥
 aaaand this is what i got.