• There is NO official Otland's Discord server and NO official Otland's server list. The Otland's Staff does not manage any Discord server or server list. Moderators or administrator of any Discord server or server lists have NO connection to the Otland's Staff. Do not get scammed!

Object Builder + Item Editor, How to Import & Export Items to the Client

Linxsis

Banned User
Joined
Nov 18, 2017
Messages
243
Solutions
10
Reaction score
114
Other Tutorials - List
Creating sprites from existing sprites.
Sprite Sheet Collage

How to import & export items in Object Builder + updating the items.otb

This is just a general tutorial how to import & export items in Object Builder also updating the items.otb using the Item Editor. Not all properties or aspects of the application have been explored

We will be using a 10.98 client and a tibia 11.5 sprite sheet for this part of the tutorial

How to import using the Animation Editor

1. Open up your target spr + dat (you do not need the exe for this).

2. Make sure Item is selected in the drop down above the Preview window.
step 2.png

3. Click the double arrows below the preview window so we can see the end of the list of items.
step 3.png

4. Go to the top menu and select Tools > Animation Editor.
step 4.png

5. Once in the Animation Editor click on File > Open and navigate to your sprite sheet or image you want to import.

6. Once that is loaded zoom in if you need to by using the slider below the preview window, in the properties tab you can change the x and y of the selected area the width and height of the area to be cropped. The columns & rows which make up the item. I have not explored groups so at present I am not really sure what that is used for.

7. You can use the x and y spindles in the properties window or drag the box or just click on the location of the image to set the selection area.

8. Once you have the area selected click on the Crop button, if you make a mistake just select the frame and click the Trash Icon to delete the frame.
step 8a.png

9. Click the play button to review the sequence if any.
step 9.png

10. Go to the main menu in this window and select File > Export.
step 10.png

Here you can choose the target client version and the file type to export the sprite you just made as a png, bmp or jpg (which would be kind of weird if it had more than 1 frame) or choose an obd file. Make sure obd is selected and click confirm button.

An obd file is a compressed file that specifically targets a client version requirements and contains all the information about the image(s).
 
Last edited:
11. Close out the Animation Editor or switch over to the Object Builder's main window and click on the Import button located below the preview window.
step 11.png

12. Navigate to the location you saved the obd file to, select the file and click open.
step 12.png

13. This will load the item we just created in as the last item in the Items window. If you did everything correctly up to this point you can see the animation sequence in the preview window. To the right of the middle window is the Sprites window, this window contains all the sprites or images which make up an item.

If you choose to delete any item from Items you should always delete the images which make up that item in Sprites, this keeps the spr less cluttered as well as a smaller file size and you more organized.

14. Go to the top menu and click on File > Compile to save your work up to this point.

15. If we double click the item we just imported, the middle window will open up 2 tabs, one labeled Texture and the other labeled Properties.

Texture
In this window we can scroll through the animation sequence or hit the play button (controls vary on which Object Builder version you are using) click on the check boxes to show the crop size or grid of the sprite.

If we hover our mouse over the image in this window we can see the sprite id number which makes up the image at each frame. If you double click the image at any key frame it will show in the Sprites window.

We can choose the width and height of the sprite, the crop size, if the item has layers, patterns of the x, y & z (I have not explored this aspect) and the animation sequence just in case we need to adjust the key frames.

Layers
-- Will be a future tutorial covering this.

Properties
Here in the properties window we can tell the client and the server what kind of item this is.

Flags & Properties

-- Will be a future tutorial covering this extensively

Back to our Fiery Sword example.
In the Properties tab.
Click the check box for Has Light and put in the Light Color check box 191, for Light Intensity put in the box 2.

Click on the Equip check box and select what type of item it is, I selected a One Hand Weapon.
Below that is a Market checkbox this will allow you to list the item on market in the game, check that box and give the item a name. Select the Category of where it will appear on the market (what section).
Set the Trade As & Show As as item's index number for me it's 23726.
You can also set the Vocation & Level required to use the item.

In the Flags section make sure Common is selected and check off Pickupable & Multi Use. Once you have everything set click on the Save button and then click on File > Compile.
 
Last edited:
Editing the items.otb
Either duplicate the recently modified spr & dat file in a separate directory or close out Object Builder.
If you open an items editor with the spr & dat in use the program will crash.

Open up an Item Editor. Go to File > Preferences and select the modified spr & dat directory and click confirm.
pref.png

Next go to File > Open and navigate to your server's data/items/ and select the items.otb
otb.png

At this point the items will load so scroll down to the very bottom of the list. You won't see the item you added in Object Builder in the list. So lets do that now and create a new item.
createitem.png

Next we will take the index id found in Object builder of the item and place it in the Client ID & Wear ID (only place it in the Wear ID if its something you wear)
createiteminfo.png

Credits to @Peonso
You can just click Edit -> Create Missing Items and than Tools -> Reload Item Attributes, and it will update all the items you added with the flags you already set at ObjectBuilder, all at once.

Save your current work and reload the items.otb file. Which should resemble this.
almostfinished.png


If you need any of these tools, please check my signature where it says Tibia Tools.
 
Last edited:
Edit the items.xml using the Server ID to load the item. I used the bright sword's values for this example.
HTML:
    <item id="26382" article="a" name="fiery sword">
        <attribute key="description" value="The blade shimmers." />
        <attribute key="weight" value="2900" />
        <attribute key="defense" value="30" />
        <attribute key="attack" value="36" />
        <attribute key="weaponType" value="sword" />
        <attribute key="extradef" value="1" />
    </item>
Copy and paste both items.otb and items.xml from data/items and save it in RME's data/1098 directory.
The new item can be found at the very bottom of Raw Pallet > Others.
aboutthere.png

Sprite Sheet used in this tutorial
 

Attachments

  • Sprites-Tutorial.png
    Sprites-Tutorial.png
    20.1 KB · Views: 191 · VirusTotal
Last edited:
but where can i get these all sprites from 11 and above?


and nice job
 
I'll be updating this tutorial as I discover new things while using Object Builder & the Item Editor.
 
it's easy to have a new guide, you have not shown anything new
 
Part 1.
Creating New Sprites from Existing Sprites


I thought this was an important topic to touch on, I just happen to be updating the items in my spr file.

I did not make the original sprite, I don't know who did. So thank you whomever you are for making this sprite :)

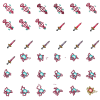
The sprite we are going to be working with is this:
2aGb9jw.png


Programs we will being using? Object Builder, Tile Studio (See attached zip)
Tile Studio runs right out of the folder there is nothing to install.

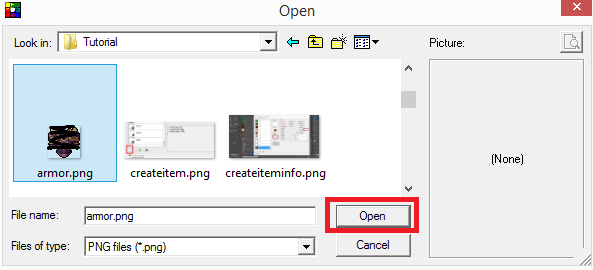
So open up Tile Studio then go to the main menu and select File > Import Tiles. select png from the file types and then click open to import the image.
P2cVg2A.png


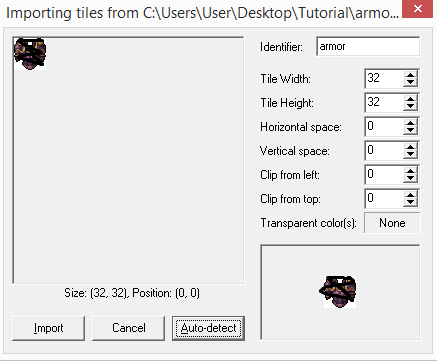
A new window will pop up asking you for the dimensions of the item. Here you can change the width/height horizontal and vertical spacing between the sprites, clipping of both left & right sides. You can also just auto detect to automatically determine what size the image should be imported as (it uses the dimensions of the image as the default). Click on the box where it says Transparency Color(s) None. The transparency color should be pink (255, 0 255)
7QC1kj5.png


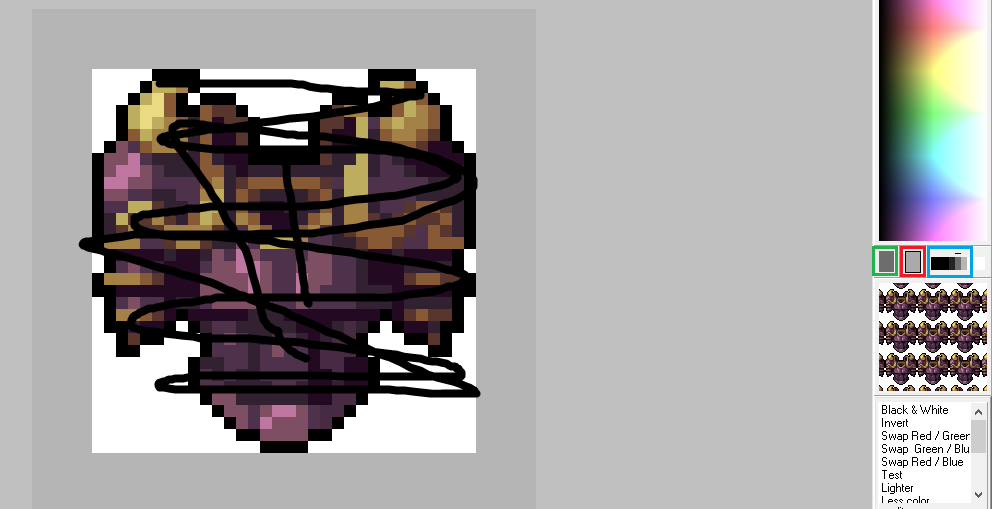
When the image loads it might come up with a white background, to the right of this window is a pallet of colors and below those colors are 3 boxes the 1st box which i have circled in green is the color you are currently using, the 2nd box which is circled in red is the alpha color (yes it comes up as grey) and third set of boxes which is circled in blue is all the shades of the color we are using.
vJD4Vcf.png


In order switch colors/alpha color you will use the right mouse button on the color you want to use, this also works when right clicking on any color within the image. Make sure you use the paint bucket tool to fill in the white background with the alpha color (box circled in red). Find your favorite color or color scheme and edit the image.

This is what I made :)
Rl6JKqI.png


Part 2
 

Attachments

Last edited by a moderator:
it's very easy everyone can do it. These are 3 steps so easy
 
Editing the items.otb
Either duplicate the recently modified spr & dat file in a separate directory or close out Object Builder.
If you open an items editor with the spr & dat in use the program will crash.

Open up an Item Editor. Go to File > Preferences and select the modified spr & dat directory and click confirm.
View attachment 31220

Next go to File > Open and navigate to your server's data/items/ and select the items.otb
View attachment 31221

At this point the items will load so scroll down to the very bottom of the list. You won't see the item you added in Object Builder in the list. So lets do that now and create a new item.
View attachment 31222

Next we will take the index id found in Object builder of the item and place it in the Client ID & Wear ID (only place it in the Wear ID if its something you wear)
View attachment 31223

Enter the other relevant information that is set in Object Builder such as the light color, light level and any corresponding flags. Save your current work and reload the items.otb file. Which should resemble this.
View attachment 31224


If you need any of these tools, please check my signature where it says Tibia Tools.
That's troublesome. You can just click Edit -> Create Missing Items and than Tools -> Reload Item Attributes, and it will update all the items you added with the flags you already set at ObjectBuilder, all at once.
 
That's troublesome. You can just click Edit -> Create Missing Items and than Tools -> Reload Item Attributes, and it will update all the items you added with the flags you already set at ObjectBuilder, all at once.
Thank you I did not know that, that is going to save us all from a world of hurt :), I'll update the tutorial with that information as soon as I am finished with Part 2.
 
Part 2.
Creating New Sprites from Existing Sprites

Once you are done with the image go to the main menu and select Edit > Copy.
copy.png

Next open up Object Builder and go to the last item in the list and click on the new button located below the preview window.
new.png

Next go to the last sprite by clicking the double arrows and click on the new button below the sprite window.
newsprite.png

Now right click the new sprite we just created and select paste.
Next double click the blank newly created item in the items list and then drag and drop the sprite to the middle window.
dragndrop.png

Then click the Save button and it should look something like this.
finished.png

Now you can edit your new item just as you did all your other items :)
 
Part 2.
Creating New Sprites from Existing Sprites

Once you are done with the image go to the main menu and select Edit > Copy.
View attachment 31235

Next open up Object Builder and go to the last item in the list and click on the new button located below the preview window.
View attachment 31236

Next go to the last sprite by clicking the double arrows and click on the new button below the sprite window.
View attachment 31237

Now right click the new sprite we just created and select paste.
Next double click the blank newly created item in the items list and then drag and drop the sprite to the middle window.
View attachment 31238

Then click the Save button and it should look something like this.
View attachment 31239

Now you can edit your new item just as you did all your other items :)
What I usually do, is to duplicate an item that have all the flags I want, and just replace the sprite of the copy. It's easier to avoid errors like this "guy with a ground without speed". Like to make a sword, I would duplicate an item like spike sword and replace the sprite with the new one.
 
I just found this, i didn't want to make a new thread just to show this off but you can make kaleidoscopes with it :)
Kaleidoscope Painter
I just made this right now.
kaleidoscopePainter.png
 
Back
Top