Linxsis
Banned User
- Joined
- Nov 18, 2017
- Messages
- 243
- Solutions
- 10
- Reaction score
- 117
Other Tutorials - List
Creating sprites from existing sprites.
Sprite Sheet Collage
How to import & export items in Object Builder + updating the items.otb
This is just a general tutorial how to import & export items in Object Builder also updating the items.otb using the Item Editor. Not all properties or aspects of the application have been explored
We will be using a 10.98 client and a tibia 11.5 sprite sheet for this part of the tutorial
How to import using the Animation Editor
1. Open up your target spr + dat (you do not need the exe for this).
2. Make sure Item is selected in the drop down above the Preview window.

3. Click the double arrows below the preview window so we can see the end of the list of items.

4. Go to the top menu and select Tools > Animation Editor.

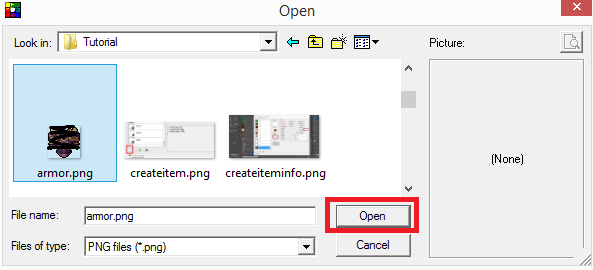
5. Once in the Animation Editor click on File > Open and navigate to your sprite sheet or image you want to import.
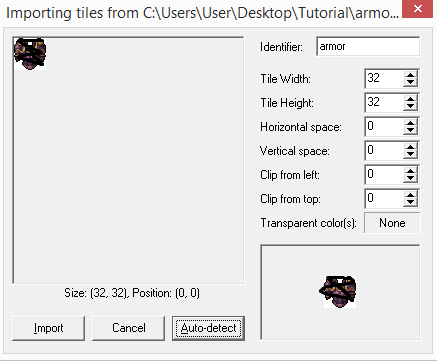
6. Once that is loaded zoom in if you need to by using the slider below the preview window, in the properties tab you can change the x and y of the selected area the width and height of the area to be cropped. The columns & rows which make up the item. I have not explored groups so at present I am not really sure what that is used for.
7. You can use the x and y spindles in the properties window or drag the box or just click on the location of the image to set the selection area.
8. Once you have the area selected click on the Crop button, if you make a mistake just select the frame and click the Trash Icon to delete the frame.

9. Click the play button to review the sequence if any.

10. Go to the main menu in this window and select File > Export.

Here you can choose the target client version and the file type to export the sprite you just made as a png, bmp or jpg (which would be kind of weird if it had more than 1 frame) or choose an obd file. Make sure obd is selected and click confirm button.
An obd file is a compressed file that specifically targets a client version requirements and contains all the information about the image(s).
Creating sprites from existing sprites.
Sprite Sheet Collage
How to import & export items in Object Builder + updating the items.otb
This is just a general tutorial how to import & export items in Object Builder also updating the items.otb using the Item Editor. Not all properties or aspects of the application have been explored
We will be using a 10.98 client and a tibia 11.5 sprite sheet for this part of the tutorial
How to import using the Animation Editor
1. Open up your target spr + dat (you do not need the exe for this).
2. Make sure Item is selected in the drop down above the Preview window.
3. Click the double arrows below the preview window so we can see the end of the list of items.
4. Go to the top menu and select Tools > Animation Editor.
5. Once in the Animation Editor click on File > Open and navigate to your sprite sheet or image you want to import.
6. Once that is loaded zoom in if you need to by using the slider below the preview window, in the properties tab you can change the x and y of the selected area the width and height of the area to be cropped. The columns & rows which make up the item. I have not explored groups so at present I am not really sure what that is used for.
7. You can use the x and y spindles in the properties window or drag the box or just click on the location of the image to set the selection area.
8. Once you have the area selected click on the Crop button, if you make a mistake just select the frame and click the Trash Icon to delete the frame.
9. Click the play button to review the sequence if any.
10. Go to the main menu in this window and select File > Export.
Here you can choose the target client version and the file type to export the sprite you just made as a png, bmp or jpg (which would be kind of weird if it had more than 1 frame) or choose an obd file. Make sure obd is selected and click confirm button.
An obd file is a compressed file that specifically targets a client version requirements and contains all the information about the image(s).
Last edited:


")