Yellowhat
BOo!
- Joined
- Mar 11, 2013
- Messages
- 514
- Reaction score
- 554
Hello again!
I hope you enjoy these series. If you have any questions or ideas or even complaints. Please post them in any thread and I'll get back to you asap.
I hope you enjoy these series. If you have any questions or ideas or even complaints. Please post them in any thread and I'll get back to you asap.
Topic: Shading pt1
Level of sprite: intermediate (Basic/medium/intermediate)
Color count:Many different
size: no-size
FAQ:
Can you make an in-depth shadow tutorial:
Yes I can. But it will be in my way.
Can you include warm/cold colors?
Well yes ofcourse")
Can you include complementary colors?
Ofcourse, but that will go for the pt2 color theory.
Start:
So let's start this though part. Shading is the most crucial part to make your sprite POP! or stand-out!
This is one of my favorite pixelarts
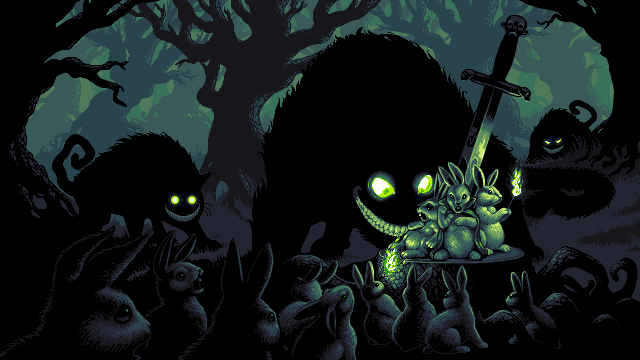
You can see that the picture focuses on shadows and the shading is very crucial getting this 3d deep(illusion).
It's also a nice mixture between warm and cold colors(For anevis (a)).
Let me explain a bit further: You can see that the forest is a dark, scary place and its night.
This would mean that you want to use as cold colors as possible and as close to black you can.
How is it in rl life when its pitch black? You can't see. But now the rabbit has a light source.
What does this mean?
Here is a scale of warm/cold colors:

As the common sense tells us, fire is red, orange and yellow. They all land in the warm color section therefor for aslong as the light source reach.. The colors will stay warm. meanwhile in the distant the colors will be cold.
Comment: I understand this is a bit hard and tricky, but if you use your senses you will get a hang of it.
Tibia always has the same light source as long as you don't put glowing eyes to your monster or fire on your weapon or smth like this.

Now take a close look at the armors and where I put the yellow arrow is where tibia light come from. And the black arrow is to illustrate where the shadows are.
Notice parts that stands out, like shoulderpads, stomach part, possible "a belt" thingy are always brighter bcs they stand out. And just beneath it is a darker color/ a shade, which always is darker then the base color.
In armors perticulary, you want to make it deep/a 3d illusion. You can do this by always trying to have the right side darker than the left.
For example if you watch the Golden armor. It is pointy at the middle, by giving it a darker color to the right side and a brighter to the left side. And also notice that the stand-out parts are alot brighter and beneath them are shades.

Next tutorial: Color theory pt2
//Yours Yellowhat