For me, I already know a lot of 3D and am no good at 2D, so yeah it is easier to do something I already know. Plus, I wouldn't call it a shortcut. It is a different method to achieve a result. I can easily spend hours and hours on a model to get it right. It takes skill and an eye for it just like 2D, just different skills and a different eye.
You are using an out of date browser. It may not display this or other websites correctly.
You should upgrade or use an alternative browser.
You should upgrade or use an alternative browser.
Using blender to create sprites...
- Thread starter Sam Drost
- Start date
Here is a better video of the process I've used. It has no audio because Blender's screencast function doesn't record audio. Here are the steps I took:
- Import the model
- Set the grid to 32 divisions (this helps me gauge how where pixel boundaries are)
- Clean up the model and get it ready for render: (Remove double vertices, recalculate normals, set faces to smooth shading)
- Set the model up so I can see the texture in the viewport (not necessary, just looks nicer)
- Add a lattice
- Set snap position to global instead of relative
- Change lattice to u: 1, v: 1, w: 2 (Linear)
- Scale lattice to 2
- Move top vertex to -.75, .75, .5
- Change rotation point to active element
- Scale all vertices by .8
- Add a lattice modifier to the model
- Scale and translate the model so that it lines up with pixel boundaries
- Set render resolution to 256x256 (4 times the size I want the final picture to be)
- Set Freestyle settings (this is what renders the outline)
- Turn specular on the model off (specular makes things look shiny. I don't want this to look shiny so I lower the intensity to 0)
- Add a camera, set it to look straight down, make it orthographic, and set it to render 2 blender units.
- Add a sun lamp pointing straight down
- Test render at full resolution to see if everything looks right (and get a render for the compositor)
- Enable nodes in the compositor
- Set up nodes so that the image is scaled down, pixelated, and scaled back up. The value used for the scaling is based on the render resolution set in step 14)
- Final render
Here you go. I combined the pixelating nodes into a group for easier management.
Attachments
-
Dracky.zip101.5 KB · Views: 58 · VirusTotal
Here is a quick creature I made from scratch this morning.
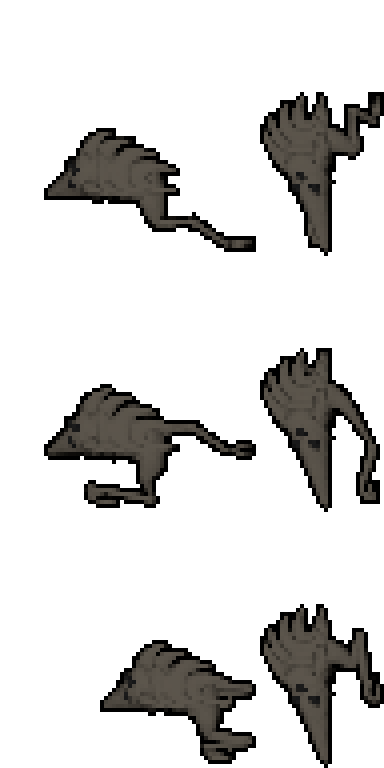
I've included the .blend file. I added a new node in the post compositor to make the freestyle lines a little sharper.
I've included the .blend file. I added a new node in the post compositor to make the freestyle lines a little sharper.
Attachments
-
Hedgehog Bug.zip734.8 KB · Views: 20 · VirusTotal


Okay, more updates to the process....
If you have a feature that you want to really stand out by putting an outline around it (for instance one side of the spikes on the Hedgehog Bug get blurred together), here's what you do:
1. Add a new Freestyle line set to the Drawing render layer (Not the Outline render layer)
2. Set Edge Types, to Logical AND
3. Check Silhouette, Countour, Crease, and click the X next to Countour.
4. Set Stroke->Caps to Round
5. Set Thickness->Base Thickness to 4
6. Set Thickness to Outside
7. Set Color->Base Color to HSV 0, 0, .15
8. Add a Material modifier to the color. Set it to Color, Diffuse Color (note: this will make the inner outlines the same color as the Diffuse color of the material they are outlining. This modifier will not have the desired effect if your material uses a texture instead of a solid color. Personally, I think with such low resolution output, a texture is probably something that can be given up for the advantages of colored outlines)
9. Select all the edges that you may want to have the outline. For the hedghog bug, I selected all the edge loops that ran from the base of the spikes to the tips of the spikes.
Another update to the process. In order to better limit the number of shades (and get closer to a hand drawn feel to it), I changed the color ramp I used to increase the contrast. Here are the settings I used.
Switch the color ramp mode to Constant instead of Linear
Add enough stops so that you have 4 stops total. All of the stops will be shades of gray (H:0, S:0) and only the V will change. I will give the pos and V of each stop
1: .5, .25
2: .625, .5
3: .75, .75
4: .875, 1
This will give you 4 shades of whatever the diffuse color is. Adding more stops will give more shades. You can play with the spacing, but I think even works best, and you don't want to move any stops lower than .5 (unless you play with moving the lighting source).
Adding these changes, to my eyes at least, really makes it look like pixel art.
At this point, I think I have done all I can to get the renderer right. The rest is left to the quality of the model. I have attached the latest .blend.
Attachments
-
Hedgehog Bug.zip769.4 KB · Views: 38 · VirusTotal
Saphron
Rare Pepe
- Joined
- Jul 7, 2010
- Messages
- 731
- Reaction score
- 1,311
It is not easier to learn how to spriting, instead of trying to build shortcuts?
This isnt a shortcut. Great video and interesting point of view on how to create correct perspective for sprite as well. Good luck
")
Garlonk
Well-Known Member
- Joined
- May 30, 2007
- Messages
- 51
- Reaction score
- 60
This is hardly a shortcut.It is not easier to learn how to spriting, instead of trying to build shortcuts?
making 3D models take way longer to do and it still require touch up to get it to look ok.
i've tested this myself, and as said in this thread already, i think particle effects is where 3d may be handy.
For all static objects it's faster to just draw it by hand.

I reworked the animation a little bit (added a little movement to the shoulders and hips to make it look a little more natural and noticed a mistake in the keyframes that was making the animation a bit wonky). I also added a border around the arms and legs, even if they are not part of the contour of the entire sprite. (Previously they did not have a border is they overlapped another part of the sprite. This has added a few borders around the fingers making the hands black, but I will probably just remove the fingers altogether (possibly leaving the thumb) since you can't really see them at this resolution anyway.
I had added a threshold to remove any partial alpha. Taking that out, the outline is partially aliased, but not as much as I expected.
I think black borders are too sharp.
> Antyaliasing < is good idea I think.
I had added a threshold to remove any partial alpha. Taking that out, the outline is partially aliased, but not as much as I expected.
I received a request for the source file for the most recent animation.
Attachments
-
Walk Cycle.zip528.8 KB · Views: 39 · VirusTotal
Israel Paterno
New Member
- Joined
- Jun 28, 2017
- Messages
- 4
- Reaction score
- 0
I am trully amazed. Man, got to tell ya, you have earned my respect.Here is a video showing how I did the image in the first post.
Two Thousand
Member
- Joined
- Aug 24, 2017
- Messages
- 40
- Reaction score
- 19
I agree this is badass
Could you make one facing the other direction of the sprite? so both views plxxx !
Could you make one facing the other direction of the sprite? so both views plxxx !
I reworked the animation a little bit (added a little movement to the shoulders and hips to make it look a little more natural and noticed a mistake in the keyframes that was making the animation a bit wonky). I also added a border around the arms and legs, even if they are not part of the contour of the entire sprite. (Previously they did not have a border is they overlapped another part of the sprite. This has added a few borders around the fingers making the hands black, but I will probably just remove the fingers altogether (possibly leaving the thumb) since you can't really see them at this resolution anyway.
I had added a threshold to remove any partial alpha. Taking that out, the outline is partially aliased, but not as much as I expected.
I agree this is badass
Could you make one facing the other direction of the sprite? so both views plxxx !
Sure thing. It is simply a matter of rotating the armature in the .blend file by Z -90 degrees and then adjusting the location to fit it into frame.
That said, here it is:
An interesting way to create sprites. I love finding new ways to achieve results.
Wondering about traditional way vs 3d way in matter of result/time effort, considering a person have similar skills in both workflows.
Wondering about traditional way vs 3d way in matter of result/time effort, considering a person have similar skills in both workflows.
I'm no pixel artist, and to me the sprites I have posted look fine (especially the last walk cycle). Others have said they need touch ups. The advantage of using 3D is that you can create a single model, and then you can animate it as needed. So creating new frames once you have the model is pretty quick in comparison. This is the reason that you don't hardly see any traditional animation anymore. With the limited amount of animation that Tibia uses, you might be better off using 2D skills if you have them and are starting from scratch. This doesn't take into account using existing models. For instance, there are hundreds of models from Dragonball, Naruto, or any other franchise that has related video games available that are already animation ready, and those could be of use to any of the servers based around that franchise.
However, and this, to me, is the most important bit about using 3D. It makes it accessible to a broader pool of people because it allows someone with a different skill set (i.e. me) to still create content.
However, and this, to me, is the most important bit about using 3D. It makes it accessible to a broader pool of people because it allows someone with a different skill set (i.e. me) to still create content.
Similar threads
- Replies
- 23
- Views
- 5K
- Replies
- 0
- Views
- 439
- Replies
- 1
- Views
- 473
- Replies
- 6
- Views
- 750