Nevermore
Banned User
Your First Open Tibia Server
By Nevermore
Hello OTLand, I am here to make your Open Tibia life a little easier by giving you a great tutorial on how to start your first Open Tibia Server. This will include some common bug error fixes, and even some useful tools to help you as you venture off into the magical world of OTs. So, what are you waiting for? Let's begin shall we?
Table Of Contents:
I. Picking The Right Server // Port Forwarding
II. Setting Up A Database // Admin Account
III. Editing Server Rates and Information
IV. Adding New Scripts
V. Putting It Online (And A Present)
Common Bugs and Errors
Tools You Should Have:
http://notepad-plus-plus.org/download/v5.9.3.html
http://www.4shared.com/file/-2fB1A0O/LaatiDo.html
http://otland.net/f19/otland-ip-changer-134369/
I. Picking The Right Server and Port Forwarding
There are many servers to choose from, but witch one is right for you? Well, lets check it out. OTServ was the first actual distribution that came out to the public, and TFS is a root of OTServ, however, OTServ lost some of its developers over time, and OTLand is just getting more and more. That means that TFS is more widely known, and it's more stable, as the community is bigger, and there is a more likely chance they would report bugs than a dead community like OTFans. So, in that case, if you had to choose between the two, TFS is your best choice. You may also want to take a look what was removed in the time of the updates, for example, if you are creating a server that you need a lot of effects in, the effect action was taken out in 8.7+, so, I would not recommend using it for that. Right now, the most stable revision is the 9.1 server. I will be using the 9.1 server in my example, as it is more widely used that any other at the moment.
:Servers:
9.1: http://otland.net/f18/9-1-forgotten-server-v0-2-11pl2-mystic-spirit-134495/
8.7: http://otland.net/f18/8-7-forgotten-server-v0-2-10-mystic-spirit-117046/
8.62: http://otland.net/f18/8-62-forgotten-server-v0-2-8-mystic-spirit-111170/
8.54: http://otland.net/f18/8-54-forgotten-server-0-3-6pl1-crying-damson-59924/
7.6: http://otland.net/f465/7-6-avesta-14522/
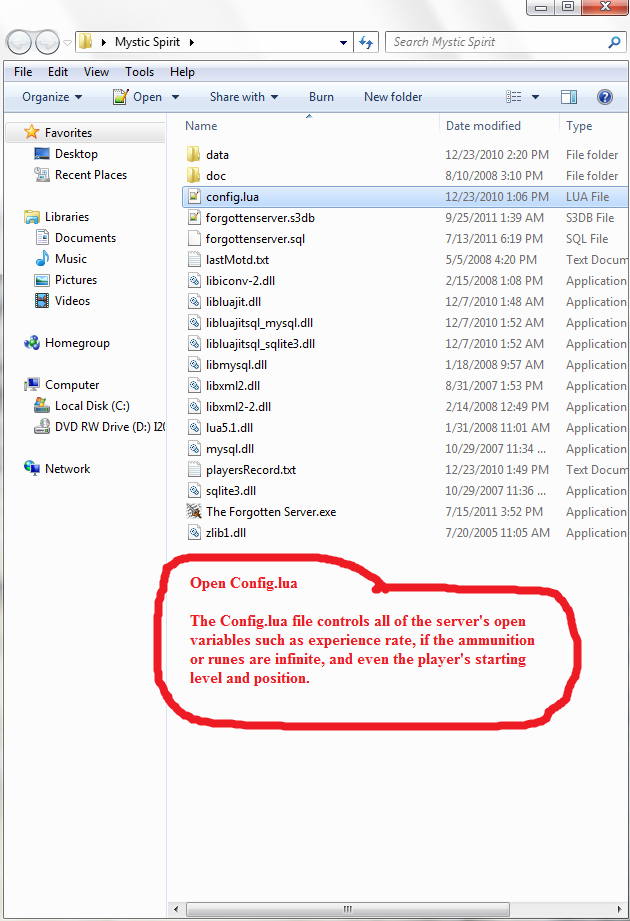
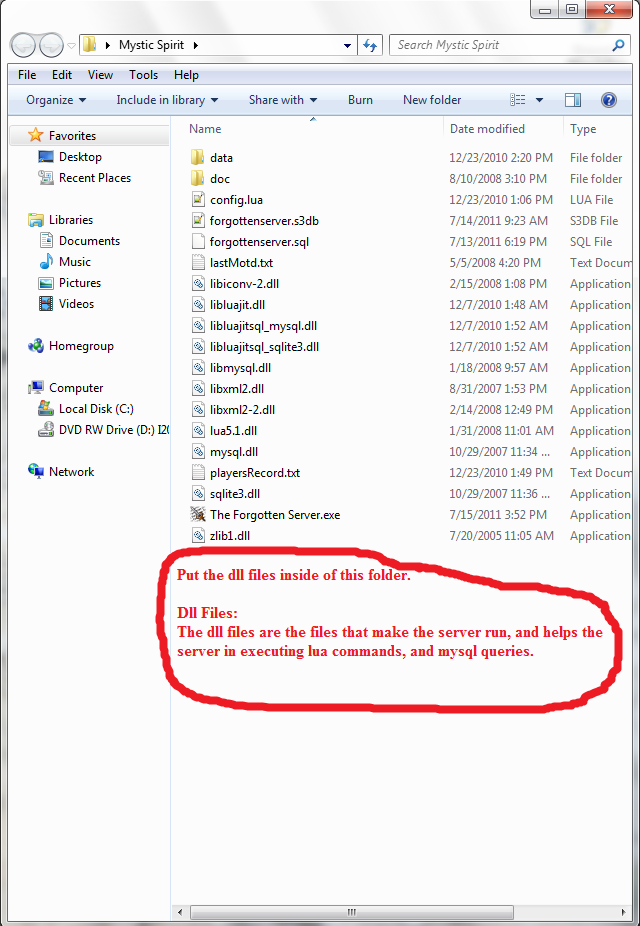
When you are downloading your server, always try and stick to the Console until you get a hang of what your doing in the server, then you can switch to GUI, the console doesn't allow you to do a lot of things, and that's good, so you don't mess up your server when playing around with it, we don't want that to happen now do we? Remember to download the .dll files along with the server, the link of the DLLs can be found in the revision's page. Put those in the root directory of your server. (The folder with the .exe in it.)
Your folder should now look like this:
You should now be able to start your server, but wait! Players cannot login, and.. well, It can't be that easy can it? Your answer is no, you are not yet ready to login, you must first forward your ports. But don't panic! It's not as hard as you might think it is, it's actually quite easy, the only hard part is finding the router model number! (BLAH!)
Things You Will Need Before Continuing:
1. A Router
2. Your Router's Model Number
3. The Router's Company Name
4. Your Default Gateway Adress
5. The Login Password For Router Setup
Now that you have finally gotten all of those things written down, we can continue on to the most boring part of making the OT, port fowarding! Yes, you heard me right. However, there is a site that makes all of your troubles go away in this task.. This site helped me understand how to do it, so I'm sure it will help you. Port Forwarding Guides Listed by Manufacturer and Model - PortForward.com You must go to that site and find your router model number under the router's company name. From there, you should find your Default Gateway address, and a tutorial to forward ports. My road has ended here, I cannot help you with this, since every router is different, however, with the guide, and the ports to foward, you should be fine! Look below for a list of the ports that you must foward.
Ports To Foward:
7171 (TCP/UDP)
7172 (TCP/UDP)
80 (TCP/UDP)
Congratulations! You just forwarded your ports! You are now ready to go onto setting up a database and an administrator account. Good job! It wasn't that hard was it?
____________________________________________
By Nevermore
Hello OTLand, I am here to make your Open Tibia life a little easier by giving you a great tutorial on how to start your first Open Tibia Server. This will include some common bug error fixes, and even some useful tools to help you as you venture off into the magical world of OTs. So, what are you waiting for? Let's begin shall we?
Table Of Contents:
I. Picking The Right Server // Port Forwarding
II. Setting Up A Database // Admin Account
III. Editing Server Rates and Information
IV. Adding New Scripts
V. Putting It Online (And A Present)
Common Bugs and Errors
Tools You Should Have:
http://notepad-plus-plus.org/download/v5.9.3.html
http://www.4shared.com/file/-2fB1A0O/LaatiDo.html
http://otland.net/f19/otland-ip-changer-134369/
I. Picking The Right Server and Port Forwarding
There are many servers to choose from, but witch one is right for you? Well, lets check it out. OTServ was the first actual distribution that came out to the public, and TFS is a root of OTServ, however, OTServ lost some of its developers over time, and OTLand is just getting more and more. That means that TFS is more widely known, and it's more stable, as the community is bigger, and there is a more likely chance they would report bugs than a dead community like OTFans. So, in that case, if you had to choose between the two, TFS is your best choice. You may also want to take a look what was removed in the time of the updates, for example, if you are creating a server that you need a lot of effects in, the effect action was taken out in 8.7+, so, I would not recommend using it for that. Right now, the most stable revision is the 9.1 server. I will be using the 9.1 server in my example, as it is more widely used that any other at the moment.
:Servers:
9.1: http://otland.net/f18/9-1-forgotten-server-v0-2-11pl2-mystic-spirit-134495/
8.7: http://otland.net/f18/8-7-forgotten-server-v0-2-10-mystic-spirit-117046/
8.62: http://otland.net/f18/8-62-forgotten-server-v0-2-8-mystic-spirit-111170/
8.54: http://otland.net/f18/8-54-forgotten-server-0-3-6pl1-crying-damson-59924/
7.6: http://otland.net/f465/7-6-avesta-14522/
When you are downloading your server, always try and stick to the Console until you get a hang of what your doing in the server, then you can switch to GUI, the console doesn't allow you to do a lot of things, and that's good, so you don't mess up your server when playing around with it, we don't want that to happen now do we? Remember to download the .dll files along with the server, the link of the DLLs can be found in the revision's page. Put those in the root directory of your server. (The folder with the .exe in it.)
Your folder should now look like this:
You should now be able to start your server, but wait! Players cannot login, and.. well, It can't be that easy can it? Your answer is no, you are not yet ready to login, you must first forward your ports. But don't panic! It's not as hard as you might think it is, it's actually quite easy, the only hard part is finding the router model number! (BLAH!)
Things You Will Need Before Continuing:
1. A Router
2. Your Router's Model Number
3. The Router's Company Name
4. Your Default Gateway Adress
5. The Login Password For Router Setup
Now that you have finally gotten all of those things written down, we can continue on to the most boring part of making the OT, port fowarding! Yes, you heard me right. However, there is a site that makes all of your troubles go away in this task.. This site helped me understand how to do it, so I'm sure it will help you. Port Forwarding Guides Listed by Manufacturer and Model - PortForward.com You must go to that site and find your router model number under the router's company name. From there, you should find your Default Gateway address, and a tutorial to forward ports. My road has ended here, I cannot help you with this, since every router is different, however, with the guide, and the ports to foward, you should be fine! Look below for a list of the ports that you must foward.
Ports To Foward:
7171 (TCP/UDP)
7172 (TCP/UDP)
80 (TCP/UDP)
Congratulations! You just forwarded your ports! You are now ready to go onto setting up a database and an administrator account. Good job! It wasn't that hard was it?
____________________________________________
Last edited: