SilverFern
Well-Known Member
- Joined
- Feb 15, 2020
- Messages
- 72
- Reaction score
- 63
Due to a sudden resurgence of people interested in hosting the leaked 7.7 server, I came up with a script to automate all the steps outlined in the excellent tutorial by @Crevasse, and also took the opportunity to make some improvements to work on a more recent version of Ubuntu.
All you need to do is to install Ubuntu in a VM, download the required files and run the scripts.
Run the commands below, which is giving execution permission to all scripts and running the install script:
Note: the script will ask you to enter a password for the MySQL database user. You can also pass it as an argument to the script, e.g.:
The installation will take about 5 minutes, depending on your resources and Internet connection.
Simply run the following commands (in that order) to start up all the services to serve the game, each one in its own terminal:
Note: make sure you replace the remaining characters with 00 bytes. Check this post for more details: Configuration - [Tutorial] Make your custom Tibia Client. (https://otland.net/threads/tutorial-make-your-custom-tibia-client.65/)
All you need to do is to install Ubuntu in a VM, download the required files and run the scripts.
1. Install Ubuntu 22.04.2 LTS (64 bits) on a virtual machine with VirtualBox
Simply follow this easy tutorial from Ubuntu, then configure your VM with the recommended settings below:- 8 GB of RAM
- 2 CPU cores
- 25 GB of disk space
- Network settings should be configured to use Bridged Adapter, so the VM will get an IP similar to your host PC (e.g.: 192.168.x.x)
Code:
su -
sudo adduser $(whoami) sudo
reboot
2. Download all required files
Go to Crevasse's post and download all attached files. You should have 6 mandatory files and 1 optional:- dennis-libraries.rar
- game
- otserv_schema_data.rar
- realotsloginserver-master.zip (from GitHub - HeavenIsLost/realotsloginserver (https://github.com/HeavenIsLost/realotsloginserver))
- realots-query-manager-master.zip
- realots-schema-inc-players.zip (optional but recommended, from Tutorial for running 7.7 CipSoft Server on Ubuntu (https://otland.net/threads/tutorial-for-running-7-7-cipsoft-server-on-ubuntu.274678/post-2670256))
- tibia-game.tarball.tar.gz
3. Install the server
Make sure all files above are in the same folder on your VM. If you runls -1, your directory should look like this:
Code:
dennis-libraries.rar
game
install.sh
otserv_schema_data.rar
realotsloginserver-master.zip
realots-query-manager-master.zip
realots-schema-inc-players.zip
start-game-server.sh
start-login-server.sh
start-query-manager.sh
tibia-game.tarball.tar.gz
Run the commands below, which is giving execution permission to all scripts and running the install script:
Code:
sudo chmod +x install.sh start-query-manager.sh start-game-server.sh start-login-server.sh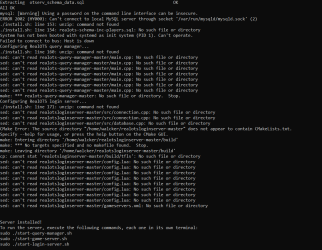
sudo ./install.shsudo ./install.sh mypasswordThe installation will take about 5 minutes, depending on your resources and Internet connection.
4. Run all services
I've included scripts to run the different services required.Simply run the following commands (in that order) to start up all the services to serve the game, each one in its own terminal:
Code:
sudo ./start-query-manager.sh
sudo ./start-game-server.sh
sudo ./start-login-server.sh
5. Customise the 7.70 client
In case you don't want to use an IP changer, you can edit the client to point to your VM server.- On a Windows PC, download and install the 7.70 client from a website like Clients Antigos - TibiaBR (https://www.tibiabr.com/downloads/clients-antigos)
- In a hex editor (e.g.: HexEd.it - Browser-based Online and Offline Hex Editing (https://hexed.it/)), import the Tibia executable file (NOT the installer) from your instal path (e.g.: "C:\Program Files (x86)\Tibia\Tibia.exe")
- Search for the hosts below and replace them with the IP address of your Ubuntu VM
Code:
test.cipsoft.com
server.tibia.com
server2.tibia.com
tibia1.cipsoft.com
tibia2.cipsoft.com6. Log in (and have fun)
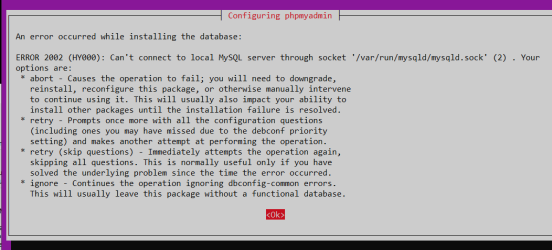
- On your VM, open the browser and go to http://localhost/phpmyadmin
- Sign in with the username "otserv" and the password you provided to this install script
- Click on the "otserv" database, then the "users" table
- You can use any "login" and "passwd" to log in to an account on the client
Future improvements
Some ideas for the community to improve this even further:- Provide a docker with everything already set up
- Provide the download link to a VM with everything pre-installed
- Automate the step of editing the client hex
- Document known issues
- When installing packages, use static versions to avoid breaking changings when downloading recent libs
- Improve security
- Provide all files in a single zip
- Automatically download files if they don't exist
- Turn it into an installer
- Include a GUI for creating accounts
- Add instructions to securely set it up for others to join your server
Attachments
-
ot-scripts-2023-04-02-0135.zip4.2 KB · Views: 742 · VirusTotal
Last edited:
")