• There is NO official Otland's Discord server and NO official Otland's server list. The Otland's Staff does not manage any Discord server or server list. Moderators or administrator of any Discord server or server lists have NO connection to the Otland's Staff. Do not get scammed!

Nothing to fully working server with RL map on Debian 7. Or just how to configure a dedicated server

dominique120

Science & Reason
Senator
Premium User
Joined
Jun 16, 2013
Messages
3,881
Solutions
3
Reaction score
1,043
Location
Númenor
Hello people and welcome to another one of my very helpful and education tutorials. This time I bring you something that will help many many people out there, whether you want to set up your new dedicated server, want to learn how to set up a web server for whatever reason or want to learn a bit about compiling TFS 1.0 on Linux this is the place.

Now Sit back and PAY ATTENTION as we go through some interesting stuff here.


We need a few things before we can start, its best if you get them now before we proceed:
Debian 7 minimal with ssh(any type will do really, just make sure to apt-get install openssh-server to have openssh installed. Also if you already installed a LAMP stack or w/e it may cause trouble.)
PuTTY
Filezilla
Notepad++

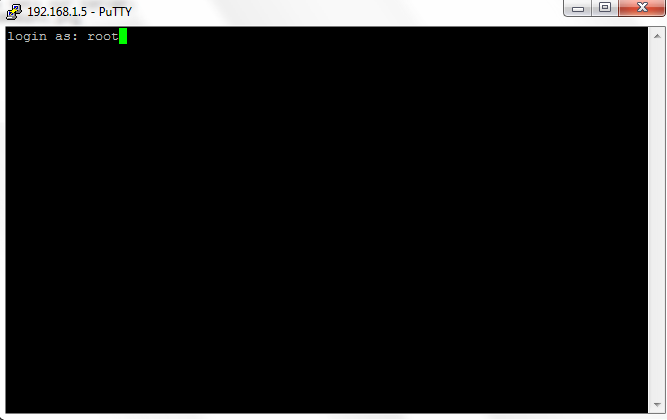
Lets start by logging into our server:
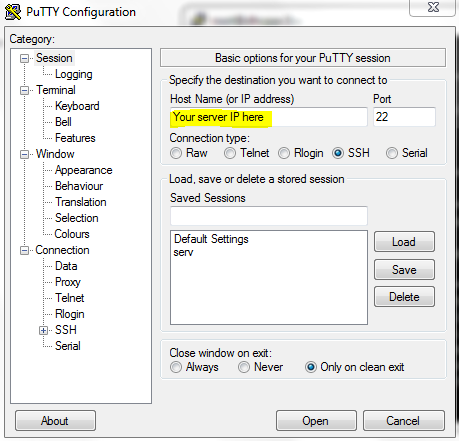
B9VDzMX.png

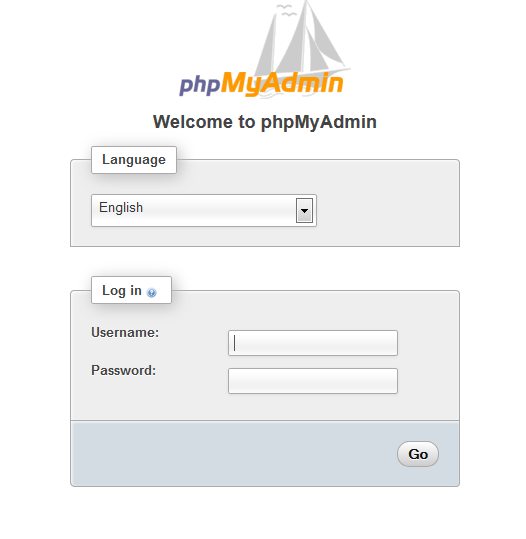
Enter your credentials:
mpFbas5.png

(If you are not logging on as a root user you must add sudo infront of all the commands we execute, or use su and continue normally.)
Now start by doing:
Code:
apt-get update
apt-get upgrade
Now lets set up a LEMP stack with phpmyadmin:
First lets install MySQL:
Use:
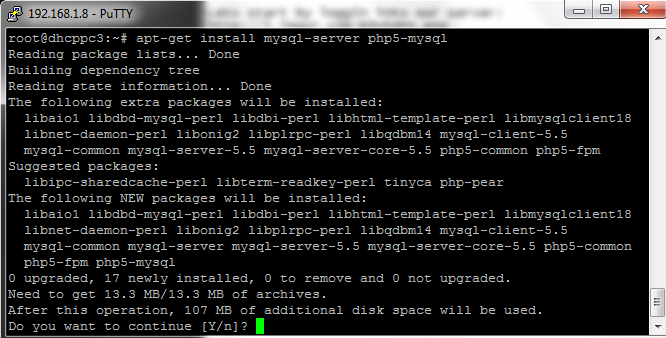
Code:
apt-get install mysql-server php5-mysql
xFLtw4x.png

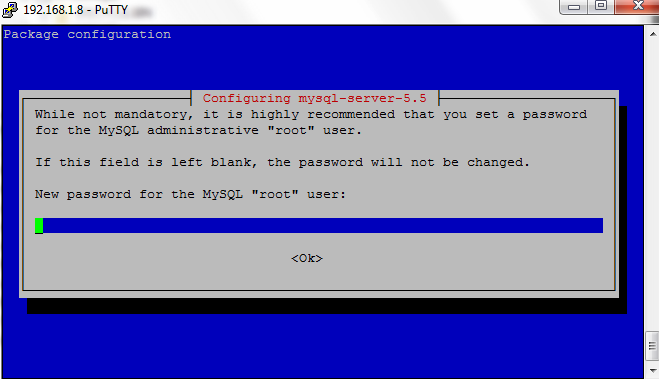
During the process you will get this:
00VmQjh.png

Enter a secure password, then confirm it in the next screen
After that wait a few seconds and it will be done

After that execute
Code:
mysql_install_db
Then we execute:
Code:
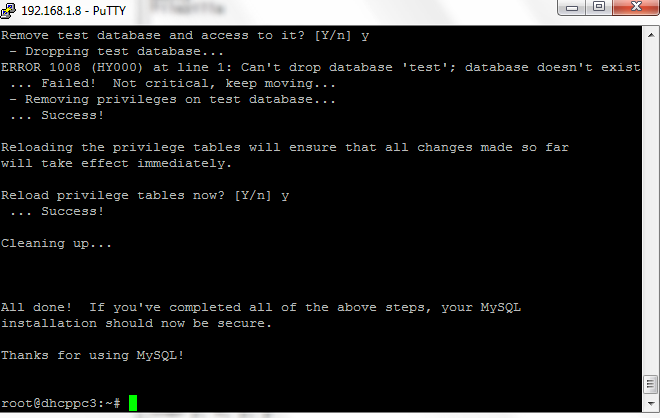
/usr/bin/mysql_secure_installation
And enter your root password


It will then ask you if you want to change the root password, change it to something secure:
then y, n, y, y

And now MySQL is set up
cmXy3fV.png

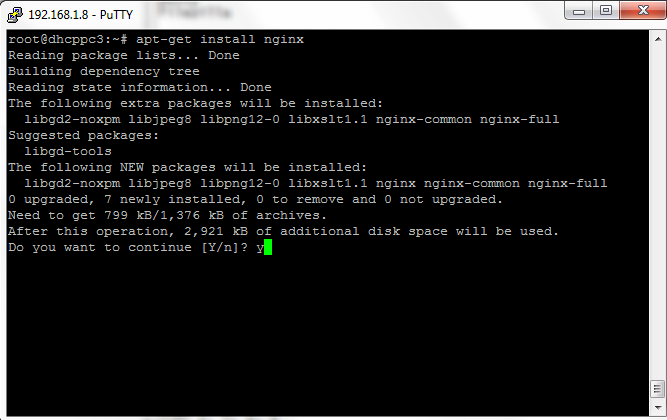
Now lets setup our web server(nginx):
Code:
apt-get install nginx

3TSKAFO.png

Now start nginx
Code:
service nginx start
Now if you go to your IP adress and everything was successful you will see this

HYJ6YBH.png

If you dont know your IP address you can use ifconfig to get it.
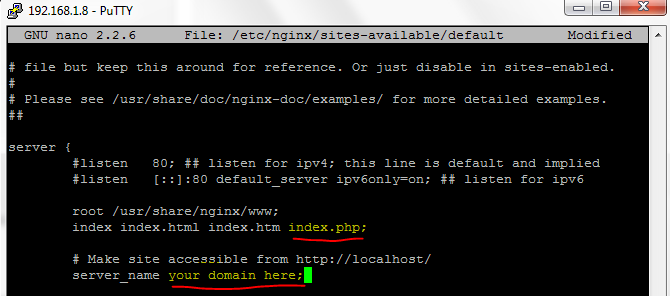
Now we must edit the config, this can be a bit tricky so be careful
Do:
Code:
nano /etc/nginx/sites-available/default
(or any other editor you like, this is nano)
Then carefully do the following edits:
8iEzjJx.png

Uncomment the following lines in yellow(remove the #)
KV7MG9f.png

Uncomment these lines as well and add the one with the red arrow
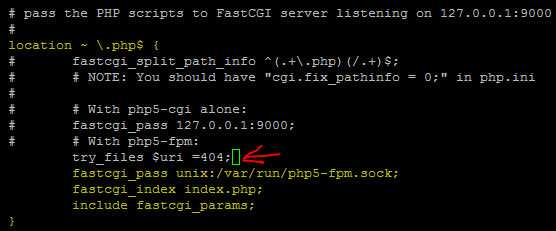
DjjIx35.png

Now save and exit

Now lets install PHP and configure it:
Code:
apt-get install php5-fpm
Now configure it
Code:
nano /etc/php5/fpm/php.ini
Find:
Code:
cgi.fix_pathinfo=1
and change it to =0
yJmgrVH.png

If its commented with a ";" just remove the ;

Now we edit another file:
Code:
nano /etc/php5/fpm/pool.d/www.conf
look for "listen = 127..." and change it to "listen = /var/run/php5-fpm.sock"
4eo6Fc4.png

Now save and exit.

And now restart php
Code:
service php5-fpm restart

Now we can test php to see if its configured by doing this:
Code:
nano /usr/share/nginx/www/info.php

Add the lines
Code:
<?php
phpinfo();
?>
Save and exit and restart nginx and test by doing:
Code:
service nginx restart
Then go to to see all the php info:
youripordomain.whatever/info.php

Now lets set up phpmyadmin
Get it by using

Code:
apt-get install phpmyadmin
You will be prompted to install for either lighthttpd or apache, just press tab then enter to configure for none. After that the install will ask you something about a database, press yes, then for some passwords, remember to set strong passwords.


Now we are going to link phpmyadmin to nginx
Code:
ln -s /usr/share/phpmyadmin/ /usr/share/nginx/www
Then restart nginx by using
Code:
service nginx restart
Now lets enter phpmyadmin by going to youripordomain.whatever/phpmyadmin
enter a user and password. If you are unsure use root and the pass you set during installation.


Continued on next post...
 
Last edited:
qO7sHP1.png

Now lets get to actually setting up our website and server. Lets start by importing the TFS 1.0 schema and adding the tables for Znotes AAC 1.5

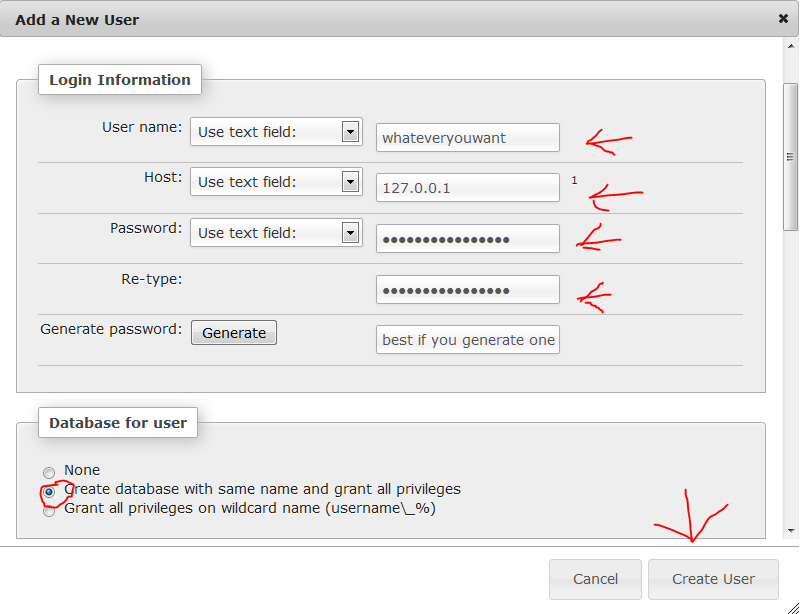
But first lets create a new user and create a database.

Go to privileges and under the table with users and stuff press on add a new user like this:

TClvKgn.png
For this tutorial I'll use tfs/tfs
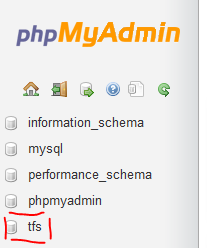
Now hit F5 on your keyboard and you'll see your new database to the left

KLwNcmt.png

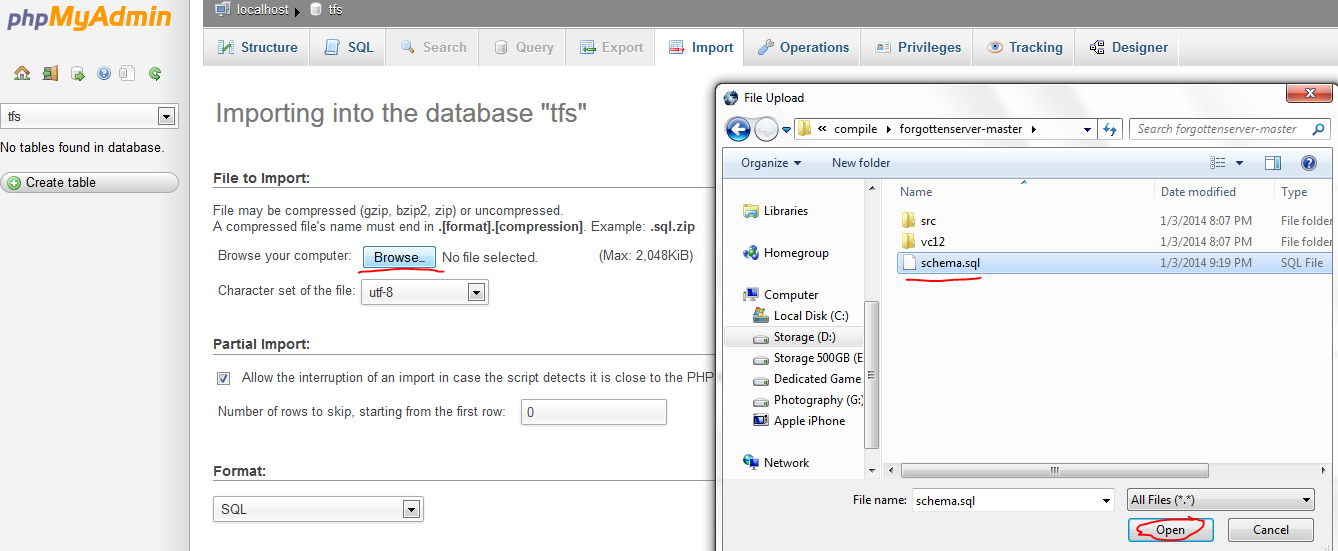
Ok now lets import our TFS 1.0 schema
Select the database and on the top press on import

vEFGXO9.png

Then hit GO
uydH7Ma.png

Then it should say:
fjj8bvP.png

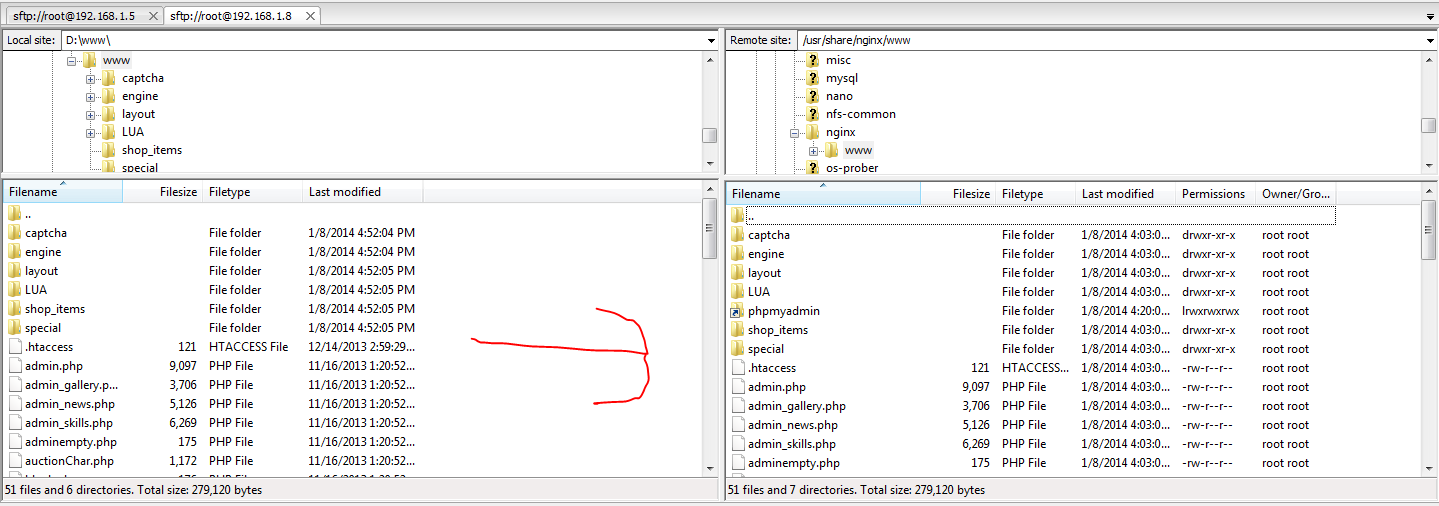
Now lets move our website files to the server(I'll be using Znotes AAC):
Open up Filezilla(or whatever you want)
and do the following:
Enter your credentials at the op like so(same ones you used to login at the very beginning)

dsoFG6U.png

then wait for it to connect and after that do this
1WMW9Jv.png

Drag and drop all your website files to /usr/share/nginx/www on the server
Then restart nginx
Code:
service nginx restart
Now go to "youripordomain.whatever/index.php"
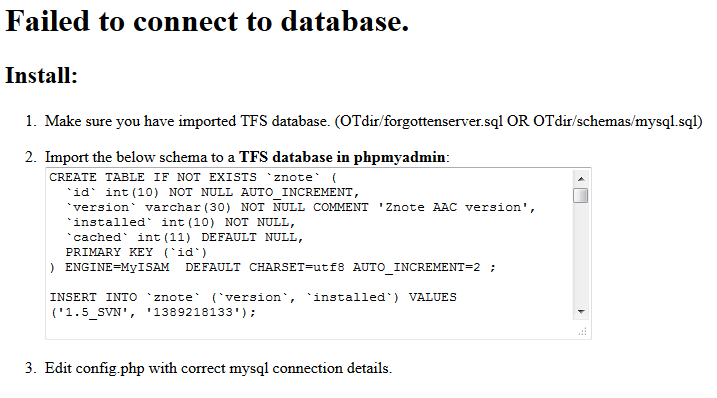
And you should see this:

uAwb0Aa.png

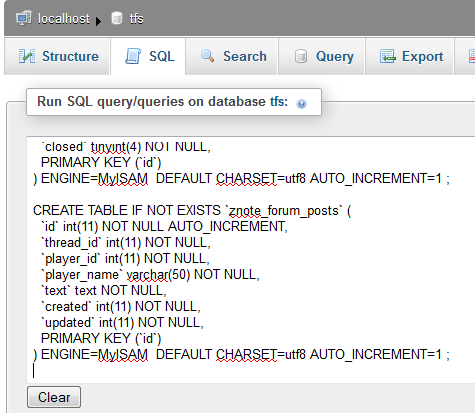
No worries, copy all that is in the box from step two and paste it in phpmyadmin like this:
HpckhUx.png

Then hit go
uydH7Ma.png

You will get no confirmation of success or failure, but usually it works, later we'll see if we got any errors or not.

Next lets configure Znotes AAC to use our database:
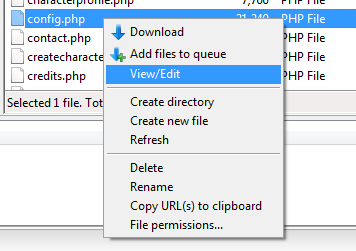
Edit the file on the server like this:

q9oRtFh.png

And edit like this:
9yXECWB.png

Remember I'm using my own values, edit them to match what you configured ones. Also, dont forget to set TFS version to TFS_10
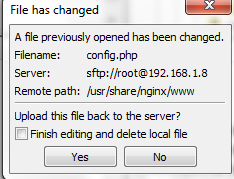
Then save and exit notepad++ and go back to filezilla
After a few secs you will get this:

P1nHIuM.png

Press yes.
Now we must do 2 more edits to the nginx config

Code:
nano /etc/nginx/sites-available/default
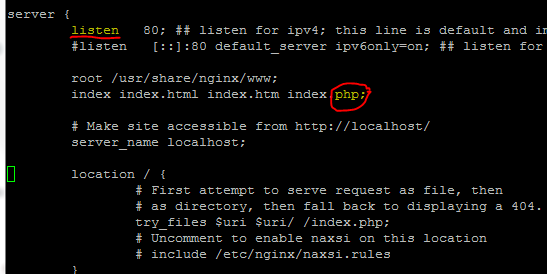
And edit like this:

nxEfFgL.png

Uncomment whats underlined and change index.html to index.php where it is circled. Then save and restart nginx
Code:
service nginx restart
Now you can reach your website simply by going to "youripordomain.whatever"

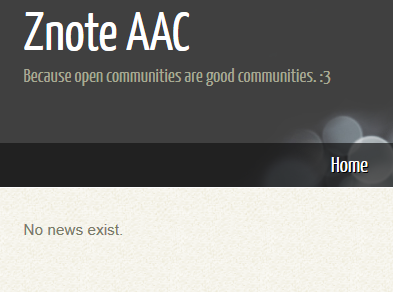
So no go to "youripordomain.whatever" to see if the database was properly configured.

It is in our case as you can see here:

2WRVfd4.png

Great now lets get down to compiling TFS 1.0
Lets get our terminal window again and run the following commands:

Code:
cd
Code:
apt-get install git cmake build-essential liblua5.2-dev libgmp3-dev libmysqlclient-dev libboost-system-dev
If you get missing files or dependencies or no such package, run apt-get update and upgrade, or add newer repositories.

Now lets clone the git project:
Code:
git clone https://github.com/otland/forgottenserver.git
Then
Code:
cd forgottenserver
Followed by
Code:
mkdir build && cd build
Generate our build files
Code:
cmake ..
And finally to build
Code:
make

After a success build you'll see this:
gSbfdcZ.png

Now lets set up our server files. I'll be using @Printers RL datapack.

Lets create a directory and more our new executable there, if you are not root, replace the /root/ with the user you are on now.
Code:
mkdir /root/tfs && mv /root/forgottenserver/build/tfs /root/tfs/tfs
cd /root/tfs
Now lets get printers pack and drop the data, and the config.lua file to our new directory.
Download it from here:
Extract it where ever you want
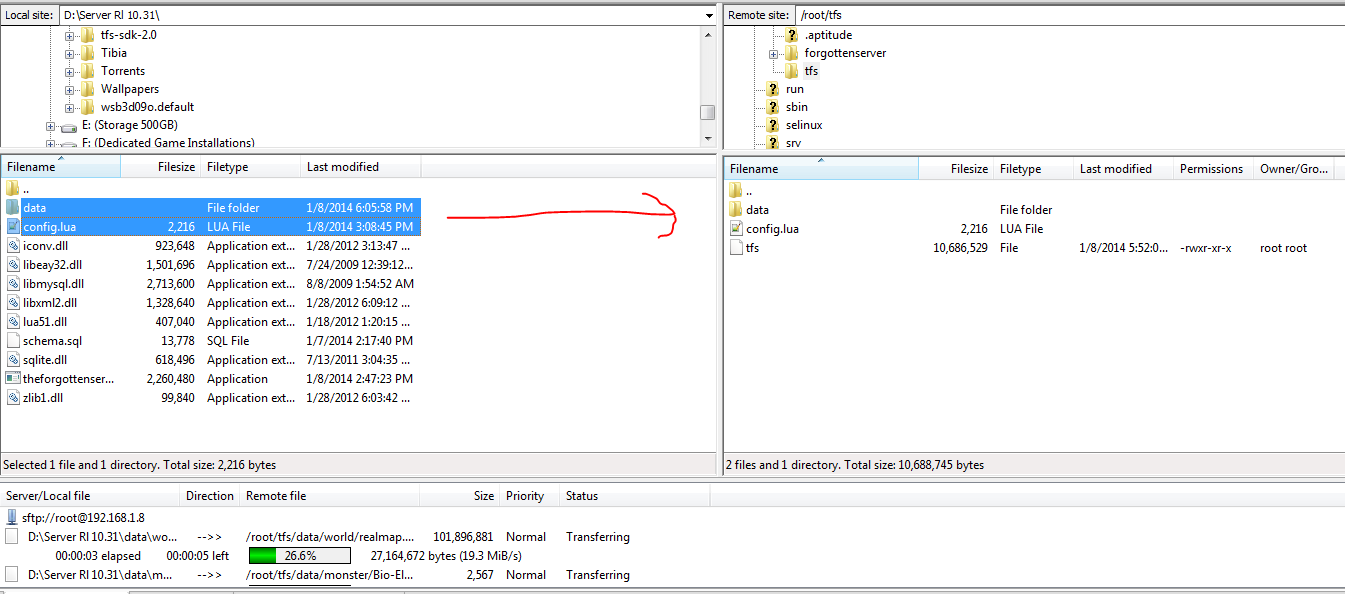
And now lets transfer the files over to our server

yNNPJFh.png

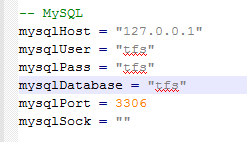
Now lets set up config.lua(the same way we edited config.php):
BHDdzxG.png

Remember to match your own settings!

Now lets start it up with
Code:
cd /root/tfs
./tfs
It will do its usual start with the log and all that then you will get:

RgdTy5F.png

And ther you go, you just set up LEMP, PHPMyAdmin, Compiled TFS 1.0 from the source, set up a datapack and a website for your OT.

You are ready to go!

Credits to @Printer for letting me use his datapack
And to @Mark because the compiling TFS part comes from the github wiki that he wrote.


NOTES:
Add your website files to
Code:
/usr/share/nginx/www
and then restart nginx
Code:
service nginx restart

And your server files to /root/tfs

to start tfs:
Code:
cd /root/tfs
./tfs

And to quit just use CTRL+C
 
Last edited:
All tips, comments, feedback and recommendations are welcome! :)
 
This was great tutorial, it will help many people with linux :) Good job!
 
Great, create one for ubuntu 12.04, gesior :)
 
Great, create one for ubuntu 12.04, gesior :)

Took me like 5 hours to do this one lol. Ubuntu is Debian based so its probably exactly the same (in 13 the www folder is in a different place afaik), and well if you can set up Znote you can probably set up Gesior as well. I might extend the tutorial, but first I want @Mark to accept the pull request for the shell I did to make the second part easier.
 
Nice !!

You can help me with this ?

root@Machoski:~/tfs# ./tfs
The Forgotten Server - Version 1.0
Compilied on Jan 20 2014 22:50:37 for arch x64

A server developed by Mark Samman
Visit our forum for updates, support, and resources: http://otland.net/.

>> Loading config
>> Establishing database connection... MySQL 5.5.34
>> Running database manager
>> Loading vocations
>> Loading items
>> Loading script systems
>> Loading monsters
>> Loading outfits
>> Checking world type... PVP
>> Loading map
> Map size: 64000x64000.
Killed

Tks !
 
qO7sHP1.png

Now lets get to actually setting up our website and server. Lets start by importing the TFS 1.0 schema and adding the tables for Znotes AAC 1.5

But first lets create a new user and create a database.

Go to privileges and under the table with users and stuff press on add a new user like this:

TClvKgn.png
For this tutorial I'll use tfs/tfs
Now hit F5 on your keyboard and you'll see your new database to the left

KLwNcmt.png

Ok now lets import our TFS 1.0 schema
Select the database and on the top press on import

vEFGXO9.png

Then hit GO
uydH7Ma.png

Then it should say:
fjj8bvP.png

Now lets move our website files to the server(I'll be using Znotes AAC):
Open up Filezilla(or whatever you want)
and do the following:
Enter your credentials at the op like so(same ones you used to login at the very beginning)

dsoFG6U.png

then wait for it to connect and after that do this
1WMW9Jv.png

Drag and drop all your website files to /usr/share/nginx/www on the server
Then restart nginx
Code:
service nginx restart
Now go to "youripordomain.whatever/index.php"
And you should see this:

uAwb0Aa.png

No worries, copy all that is in the box from step two and paste it in phpmyadmin like this:
HpckhUx.png

Then hit go
uydH7Ma.png

You will get no confirmation of success or failure, but usually it works, later we'll see if we got any errors or not.

Next lets configure Znotes AAC to use our database:
Edit the file on the server like this:

q9oRtFh.png

And edit like this:
9yXECWB.png

Remember I'm using my own values, edit them to match what you configured ones. Also, dont forget to set TFS version to TFS_10
Then save and exit notepad++ and go back to filezilla
After a few secs you will get this:

P1nHIuM.png

Press yes.
Now we must do 2 more edits to the nginx config

Code:
nano /etc/nginx/sites-available/default
And edit like this:

nxEfFgL.png

Uncomment whats underlined and change index.html to index.php where it is circled. Then save and restart nginx
Code:
service nginx restart
Now you can reach your website simply by going to "youripordomain.whatever"

So no go to "youripordomain.whatever" to see if the database was properly configured.

It is in our case as you can see here:

2WRVfd4.png

Great now lets get down to compiling TFS 1.0
Lets get our terminal window again and run the following commands:

Code:
cd
Code:
apt-get install git cmake build-essential liblua5.2-dev libgmp3-dev libmysqlclient-dev libboost-system-dev
If you get missing files or dependencies or no such package, run apt-get update and upgrade, or add newer repositories.

Now lets clone the git project:
Code:
git clone https://github.com/otland/forgottenserver.git
Then
Code:
cd forgottenserver
Followed by
Code:
mkdir build && cd build
Generate our build files
Code:
cmake ..
And finally to build
Code:
make

After a success build you'll see this:
gSbfdcZ.png

Now lets set up our server files. I'll be using @Printers RL datapack.

Lets create a directory and more our new executable there
Code:
mkdir /root/tfs && mv /root/forgottenserver/build/tfs /root/tfs/tfs
cd /root/tfs
Now lets get printers pack and drop the data, and the config.lua file to our new directory.
Download it from here:
Extract it where ever you want
And now lets transfer the files over to our server

yNNPJFh.png

Now lets set up config.lua(the same way we edited config.php):
BHDdzxG.png

Remember to match your own settings!

Now lets start it up with
Code:
cd /root/tfs
./tfs
It will do its usual start with the log and all that then you will get:

RgdTy5F.png

And ther you go, you just set up LEMP, PHPMyAdmin, Compiled TFS 1.0 from the source, set up a datapack and a website for your OT.

You are ready to go!

Credits to @Printer for letting me use his datapack
And to @Mark because the compiling TFS part comes from the github wiki that he wrote.


NOTES:
Add your website files to
Code:
/usr/share/nginx/www
and then restart nginx
Code:
service nginx restart

And your server files to /root/tfs

to start tfs:
Code:
cd /root/tfs
./tfs

And to quit just use CTRL+C
Awesome!
 
Back
Top